Build a Monthly Subscription Platform Using Celo Composer & Openzeppelin Defender

Build a Monthly Subscription Platform Using Celo Composer & Openzeppelin Defender https://celo.academy/uploads/default/optimized/2X/b/b34d2d31067280e00ce55bdb54b9e22ce8ee50cd_2_1024x576.png
none 0.0 0

Introduction

This comprehensive tutorial will guide you through setting up a crypto payment subscription platform on Celo. By the end of this tutorial, you will have a working subscription platform and the knowledge to customize and expand it for your unique needs. This tutorial will be broken up into four parts; you must follow them in order as they build upon one another.

Background Knowledge

In the web2 world, it’s a commonplace to offer subscription services and allow your customer to link a debit card so you can charge them periodically for the time of their subscription, with the advent of a stable currency and merchants accepting them alongside existing payment methods such as Paypal and card, their needs to be full compatibility of auto payment charge.

Prerequisites

To start building, you’ll need a basic understanding of web development, Node (v16), yarn, and Git.

  • Your computer has Node.js installed. If not, download from here
  • Familiar with React/Nextjs

Requirements

For our project, we would need the following tools and framework.

  • Celo Composer React App - for UI
  • Subgraph Packages - to index the data on the blockchain such that it’s possible to query people’s payments.
  • OpenZeppelin Defender Admin
  • Auto Task and Relayer

Github Code

For your reference, you can use the completed tutorial github code

Getting Started

We need to create our payment subscription Contract and UI with Nextjs and tailwind CSS to get started.

Install the Celo composer to set up our development environment and create a new Celo composer. On your terminal, run these two commands;

npm i @Celo_Academy/celocomposer -g
npx celo-composer-create

This will prompt you to select the framework and the template you want to use

After choosing the framework and the template, you’ll be prompted to select the smart contract development environment tool, decide whether or not to enable subgraph support and give the project a name. Your terminal should seem like this at the end.

Open up your folder on your VS Code and run yarn install to install the dependencies and yarn run react:app dey in your terminal to start our local environment. Your web interface should look like this.

Next, we need to create the cards as seen on the Create a new file called PaymentCard.js in your component folder and add the following code inside.

import React from "react";

export default function PaymentCard({ planName, price }) {
  return (
    <div className="flex flex-col max-w-lg p-6 mx-auto text-center text-gray-900 bg-white border border-gray-100 rounded-lg shadow dark:border-gray-600 xl:p-8 dark:bg-gray-800 dark:text-white">
      <h3 className="mb-4 text-2xl font-semibold">{planName}</h3>
      <p className="font-light text-gray-500 sm:text-lg dark:text-gray-400">
        Best option for personal use &amp; for your next project.
      </p>
      <div className="flex items-baseline justify-center my-8">
        <span className="mr-2 text-3xl font-extrabold">{price} cUSD</span>
        <span className="text-gray-500 dark:text-gray-400">/month</span>
      </div>

      <ul role="list" className="mb-8 space-y-4 text-left">
        <li className="flex items-center space-x-3">
          <svg
            className="flex-shrink-0 w-5 h-5 text-green-500 dark:text-green-400"
            fill="currentColor"
            viewBox="0 0 20 20"
            xmlns="http://www.w3.org/2000/svg"
          >
            <path
              fill-rule="evenodd"
              d="M16.707 5.293a1 1 0 010 1.414l-8 8a1 1 0 01-1.414 0l-4-4a1 1 0 011.414-1.414L8 12.586l7.293-7.293a1 1 0 011.414 0z"
              clip-rule="evenodd"
            ></path>
          </svg>
          <span>Individual configuration</span>
        </li>
        <li className="flex items-center space-x-3">
          <svg
            className="flex-shrink-0 w-5 h-5 text-green-500 dark:text-green-400"
            fill="currentColor"
            viewBox="0 0 20 20"
            xmlns="http://www.w3.org/2000/svg"
          >
            <path
              fill-rule="evenodd"
              d="M16.707 5.293a1 1 0 010 1.414l-8 8a1 1 0 01-1.414 0l-4-4a1 1 0 011.414-1.414L8 12.586l7.293-7.293a1 1 0 011.414 0z"
              clip-rule="evenodd"
            ></path>
          </svg>
          <span>No setup, or hidden fees</span>
        </li>
        <li className="flex items-center space-x-3">
          <svg
            className="flex-shrink-0 w-5 h-5 text-green-500 dark:text-green-400"
            fill="currentColor"
            viewBox="0 0 20 20"
            xmlns="http://www.w3.org/2000/svg"
          >
            <path
              fill-rule="evenodd"
              d="M16.707 5.293a1 1 0 010 1.414l-8 8a1 1 0 01-1.414 0l-4-4a1 1 0 011.414-1.414L8 12.586l7.293-7.293a1 1 0 011.414 0z"
              clip-rule="evenodd"
            ></path>
          </svg>
          <span>
            Team size: <span className="font-semibold">1 developer</span>
          </span>
        </li>
        <li className="flex items-center space-x-3">
          <svg
            className="flex-shrink-0 w-5 h-5 text-green-500 dark:text-green-400"
            fill="currentColor"
            viewBox="0 0 20 20"
            xmlns="http://www.w3.org/2000/svg"
          >
            <path
              fillRule="evenodd"
              d="M16.707 5.293a1 1 0 010 1.414l-8 8a1 1 0 01-1.414 0l-4-4a1 1 0 011.414-1.414L8 12.586l7.293-7.293a1 1 0 011.414 0z"
              clip-rule="evenodd"
            ></path>
          </svg>
          <span>
            Premium support: <span className="font-semibold">6 months</span>
          </span>
        </li>
        <li className="flex items-center space-x-3">
          <svg
            className="flex-shrink-0 w-5 h-5 text-green-500 dark:text-green-400"
            fill="currentColor"
            viewBox="0 0 20 20"
            xmlns="http://www.w3.org/2000/svg"
          >
            <path
              fill-rule="evenodd"
              d="M16.707 5.293a1 1 0 010 1.414l-8 8a1 1 0 01-1.414 0l-4-4a1 1 0 011.414-1.414L8 12.586l7.293-7.293a1 1 0 011.414 0z"
              clip-rule="evenodd"
            ></path>
          </svg>
          <span>
            Free updates: <span className="font-semibold">6 months</span>
          </span>
        </li>
      </ul>
      <a
        href="#"
        className="text-white bg-purple-600 hover:bg-purple-700 focus:ring-4 focus:ring-purple-200 font-medium rounded-lg text-sm px-5 py-2.5 text-center dark:text-white  dark:focus:ring-purple-900"
      >
        Get started
      </a>
    </div>
  );
}

4 In your index.tx file , import your payment card, your final code should look like this.

import React, { useEffect, useState } from "react";
import PaymentCard from "../components/PaymentCard";

export default function Home() {
  return (
    <div className="space-y-8 lg:grid lg:grid-cols-3 sm:gap-6 xl:gap-10 lg:space-y-0">
      <div className="flex">
        <PaymentCard planName={"Basic"} price={2} />
      </div>
      <div className="flex">
        <PaymentCard planName={"Premium"} price={5} />
      </div>
      <div className="flex">
        <PaymentCard planName={"Enterprise"} price={12} />
      </div>
    </div>
  );
}

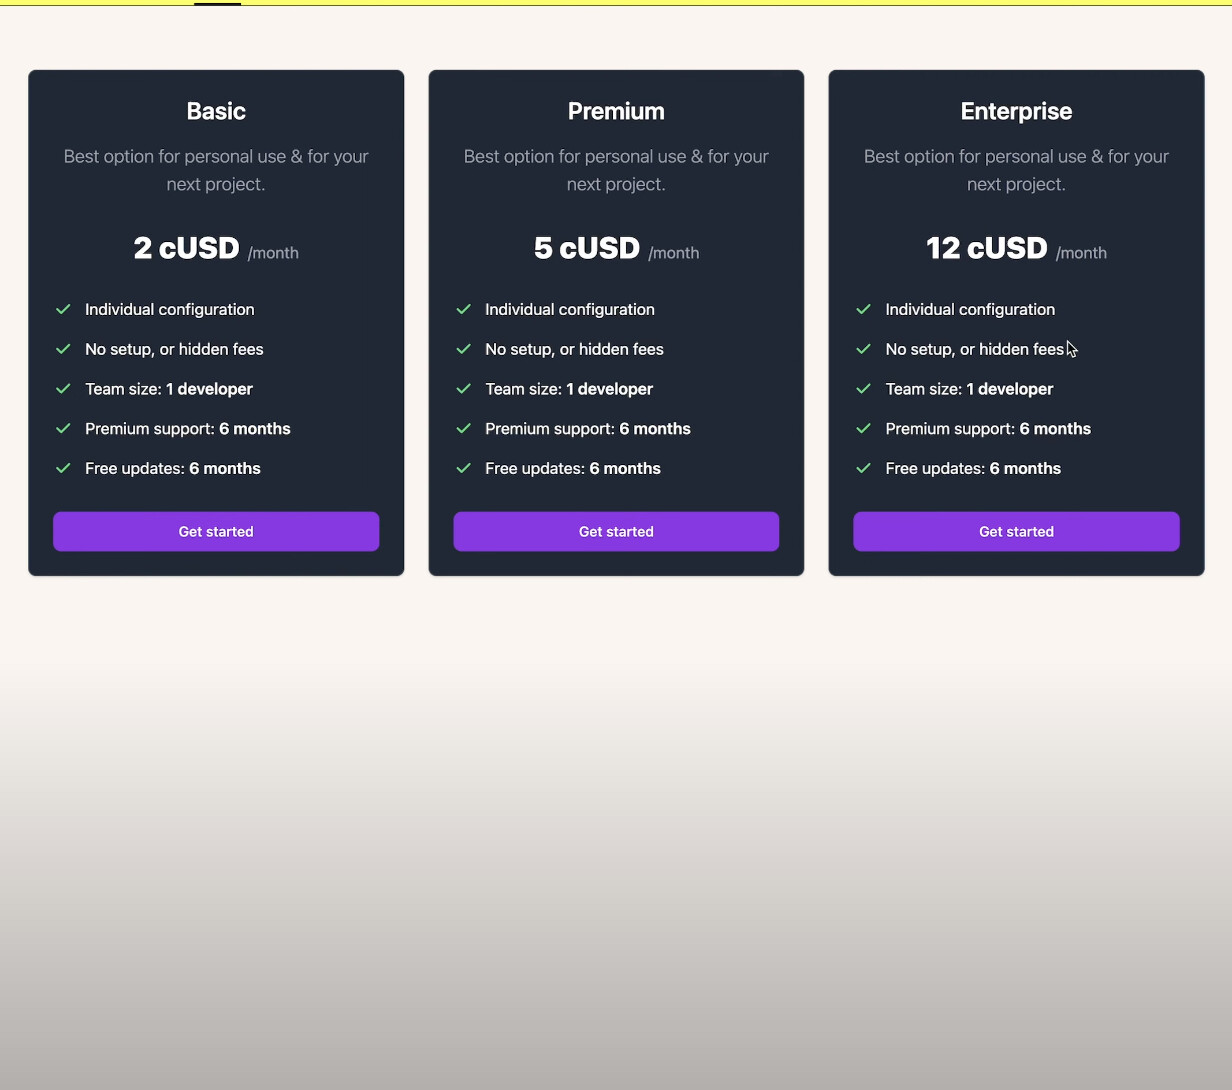
Result below. However, you can choose to add more cards to your project and play around with the styling, but for this tutorial, we are just going to stick to three different payment plans.

After this, click on your connect wallet button to see if it works. Once it works, it’s meant to show a disconnect button. However, we must also display the network it’s been connected to and the wallet’s address. So in your Header.tsx file, duplicate the button tag and add two more buttons to the header. Your final code should look like this.

import { Disclosure } from "@headlessui/react";
import { Bars3Icon, XMarkIcon } from "@heroicons/react/24/outline";
import { useCelo } from "@Celo_Academy/react-celo";
import Image from "next/image";
import { useEffect, useState } from "react";

export default function Header() {
  let [componentInitialized, setComponentInitialized] = useState(false);
  let { initialised, address, network, connect, disconnect } = useCelo();

  useEffect(() => {
    if (initialised) {
      setComponentInitialized(true);
    }
  }, [initialised]);

  return (
    <Disclosure as="nav" className="bg-prosperity border-b border-black">
      {({ open }) => (
        <>
          <div className="mx-auto max-w-7xl px-2 sm:px-6 lg:px-8">
            <div className="relative flex h-16 justify-between">
              <div className="absolute inset-y-0 left-0 flex items-center sm:hidden">
                {/* Mobile menu button */}
                <Disclosure.Button className="inline-flex items-center justify-center rounded-md p-2 text-black focus:outline-none focus:ring-1 focus:ring-inset focus:rounded-none focus:ring-black">
                  <span className="sr-only">Open main menu</span>
                  {open ? (
                    <XMarkIcon className="block h-6 w-6" aria-hidden="true" />
                  ) : (
                    <Bars3Icon className="block h-6 w-6" aria-hidden="true" />
                  )}
                </Disclosure.Button>
              </div>
              <div className="flex flex-1 items-center justify-center sm:items-stretch sm:justify-start">
                <div className="flex flex-shrink-0 items-center">
                  <Image
                    className="block h-8 w-auto lg:block"
                    src="/logo.svg"
                    width="24"
                    height="24"
                    alt="Celo Logo"
                  />
                </div>
                <div className="hidden sm:ml-6 sm:flex sm:space-x-8">
                  <a
                    href="#"
                    className="inline-flex items-center border-b-2 border-black px-1 pt-1 text-sm font-medium text-gray-900"
                  >
                    Home
                  </a>
                </div>
              </div>
              <div className="absolute inset-y-0 right-0 flex items-center pr-2 sm:static sm:inset-auto sm:ml-6 sm:pr-0">
                {componentInitialized && address ? (
                  <>
                    <button
                      type="button"
                      className="mr-2 inline-flex content-center place-items-center rounded-full border border-wood bg-black py-2 px-5 text-md font-medium text-snow hover:bg-forest"
                    >
                      {network.name}
                    </button>
                    <button
                      type="button"
                      className="mr-2 inline-flex content-center place-items-center rounded-full border border-wood bg-black py-2 px-5 text-md font-medium text-snow hover:bg-forest"
                    >
                      {truncateAddress(address)}
                    </button>
                    <button
                      type="button"
                      className="inline-flex content-center place-items-center rounded-full border border-wood bg-black py-2 px-5 text-md font-medium text-snow hover:bg-forest"
                      onClick={disconnect}
                    >
                      Disconnect
                    </button>
                  </>
                ) : (
                  <button
                    type="button"
                    className="inline-flex content-center place-items-center rounded-full border border-wood bg-forest py-2 px-5 text-md font-medium text-snow hover:bg-black"
                    onClick={() =>
                      connect().catch((e) => console.log((e as Error).message))
                    }
                  >
                    Connect
                  </button>
                )}
              </div>
            </div>
          </div>
          <Disclosure.Panel className="sm:hidden">
            <div className="space-y-1 pt-2 pb-4">
              <Disclosure.Button
                as="a"
                href="#"
                className="block border-l-4 border-black py-2 pl-3 pr-4 text-base font-medium text-black"
              >
                Home
              </Disclosure.Button>
              {/* Add here your custom menu elements */}
            </div>
          </Disclosure.Panel>
        </>
      )}
    </Disclosure>
  );
}

Your output should look like the below. After connecting your wallet, you can see the Alfajores network and your wallet address.

However, the address button is too long and doesn’t look nice. We can make this better by truncating the address.

Add the following code below your imports and also call the truncate.

const truncateAddress = (address: string) => {
  return `${address.slice(0, 6)}...${address.slice(-4)}`;
};

Your final code should look like this.

import { Disclosure } from "@headlessui/react";
import { Bars3Icon, XMarkIcon } from "@heroicons/react/24/outline";
import { useCelo } from "@Celo_Academy/react-celo";
import Image from "next/image";
import { useEffect, useState } from "react";

const truncateAddress = (address: string) => {
  return `${address.slice(0, 6)}...${address.slice(-4)}`;
};
export default function Header() {
  let [componentInitialized, setComponentInitialized] = useState(false);
  let { initialised, address, network, connect, disconnect } = useCelo();

  useEffect(() => {
    if (initialised) {
      setComponentInitialized(true);
    }
  }, [initialised]);

  return (
    <Disclosure as="nav" className="bg-prosperity border-b border-black">
      {({ open }) => (
        <>
          <div className="mx-auto max-w-7xl px-2 sm:px-6 lg:px-8">
            <div className="relative flex h-16 justify-between">
              <div className="absolute inset-y-0 left-0 flex items-center sm:hidden">
                {/* Mobile menu button */}
                <Disclosure.Button className="inline-flex items-center justify-center rounded-md p-2 text-black focus:outline-none focus:ring-1 focus:ring-inset focus:rounded-none focus:ring-black">
                  <span className="sr-only">Open main menu</span>
                  {open ? (
                    <XMarkIcon className="block h-6 w-6" aria-hidden="true" />
                  ) : (
                    <Bars3Icon className="block h-6 w-6" aria-hidden="true" />
                  )}
                </Disclosure.Button>
              </div>
              <div className="flex flex-1 items-center justify-center sm:items-stretch sm:justify-start">
                <div className="flex flex-shrink-0 items-center">
                  <Image
                    className="block h-8 w-auto lg:block"
                    src="/logo.svg"
                    width="24"
                    height="24"
                    alt="Celo Logo"
                  />
                </div>
                <div className="hidden sm:ml-6 sm:flex sm:space-x-8">
                  <a
                    href="#"
                    className="inline-flex items-center border-b-2 border-black px-1 pt-1 text-sm font-medium text-gray-900"
                  >
                    Home
                  </a>
                </div>
              </div>
              <div className="absolute inset-y-0 right-0 flex items-center pr-2 sm:static sm:inset-auto sm:ml-6 sm:pr-0">
                {componentInitialized && address ? (
                  <>
                    <button
                      type="button"
                      className="mr-2 inline-flex content-center place-items-center rounded-full border border-wood bg-black py-2 px-5 text-md font-medium text-snow hover:bg-forest"
                    >
                      {network.name}
                    </button>
                    <button
                      type="button"
                      className="mr-2 inline-flex content-center place-items-center rounded-full border border-wood bg-black py-2 px-5 text-md font-medium text-snow hover:bg-forest"
                    >
                      {truncateAddress(address)}
                    </button>
                    <button
                      type="button"
                      className="inline-flex content-center place-items-center rounded-full border border-wood bg-black py-2 px-5 text-md font-medium text-snow hover:bg-forest"
                      onClick={disconnect}
                    >
                      Disconnect
                    </button>
                  </>
                ) : (
                  <button
                    type="button"
                    className="inline-flex content-center place-items-center rounded-full border border-wood bg-forest py-2 px-5 text-md font-medium text-snow hover:bg-black"
                    onClick={() =>
                      connect().catch((e) => console.log((e as Error).message))
                    }
                  >
                    Connect
                  </button>
                )}
              </div>
            </div>
          </div>
          <Disclosure.Panel className="sm:hidden">
            <div className="space-y-1 pt-2 pb-4">
              <Disclosure.Button
                as="a"
                href="#"
                className="block border-l-4 border-black py-2 pl-3 pr-4 text-base font-medium text-black"
              >
                Home
              </Disclosure.Button>
              {/* Add here your custom menu elements */}
            </div>
          </Disclosure.Panel>
        </>
      )}
    </Disclosure>
  );
}

After this, we will write our smart contract that interacts with our subscription, so head over to your terminal and run this command yarn run hardhat:accounts to view the account setup. You should get an error message stating you do not have any account setup; therefore, we need a deployer wallet. To do this, rename the file *env.example to .env and add a test private key that has already been given by celo here and copy the private key already given to us.

6 After this, re-run the above command, and you should see an address in your terminal. Verify if the account has some Celo in it via celoscan, and if it doesn’t, you can request a test token via celo faucet. Head over to openzepplin contracts and make use of the wizard shown below and copy the code generated into a new file created in the contract folder called MockCUSD.sol file

Let’s install some OpenZeppelin contracts so we can get access to the ERC-721 contracts. In your terminal, execute the following command:

cd ..
cd hardhat
yarn add @openzeppelin/contracts
  • In the contracts folder, create a new Solidity file called PaymentSubscription.sol
  • Now, we would write some code in the PaymentSubscription.sol. We would be importing Openzeppelin’s ERC721 Contract.
// SPDX-License-Identifier: MIT
pragma solidity ^0.8.0;

import "@openzeppelin/contracts/token/ERC20/IERC20.sol";
import "@openzeppelin/contracts/security/Pausable.sol";
import "@openzeppelin/contracts/access/Ownable.sol";
import "hardhat/console.sol";

contract PaymentSubscription is Pausable, Ownable {
    //Available plans
    enum Plan {
        Basic,
        Premium,
        Enterprise
    }

    struct Subscription {
        Plan plan;
        uint256 price;
        uint256 startDate;
        uint256 endDate;
        uint256 nextCharge;
        bool active;
    }

    struct PlanDetail {
        Plan plan;
        uint256 price;
        uint256 duration;
    }

    //All plans
    mapping(Plan => PlanDetail) public plans;

    //All subscriptions
    mapping(address => Subscription) public subscriptions;

    //Active subscriptions
    mapping(address => bool) public activeSubscriptions;

    //Emits when a new plan is created
    event PlanCreated(Plan plan, uint256 price, uint256 duration);

    event SubscriptionCreated(address indexed subscriber, Plan plan);
    event SubscriptionCancelled(address indexed subscriber);
    event SubscriptionCharged(
        address indexed subscriber,
        Plan plan,
        uint256 nextCharge
    );

    //Token used for subscription payments
    address public subscriptionToken;

    constructor(address _subscriptionToken) {
        require(_subscriptionToken != address(0), "Invalid token address");
        subscriptionToken = _subscriptionToken;
        plans[Plan.Basic] = PlanDetail(Plan.Basic, 2e18, 1 hours);
        plans[Plan.Premium] = PlanDetail(Plan.Premium, 5e18, 1 hours);
        plans[Plan.Enterprise] = PlanDetail(Plan.Enterprise, 12e18, 1 hours);

        emit PlanCreated(Plan.Basic, 2e18, 1 hours);
        emit PlanCreated(Plan.Premium, 5e18, 1 hours);
        emit PlanCreated(Plan.Enterprise, 12e18, 1 hours);
    }

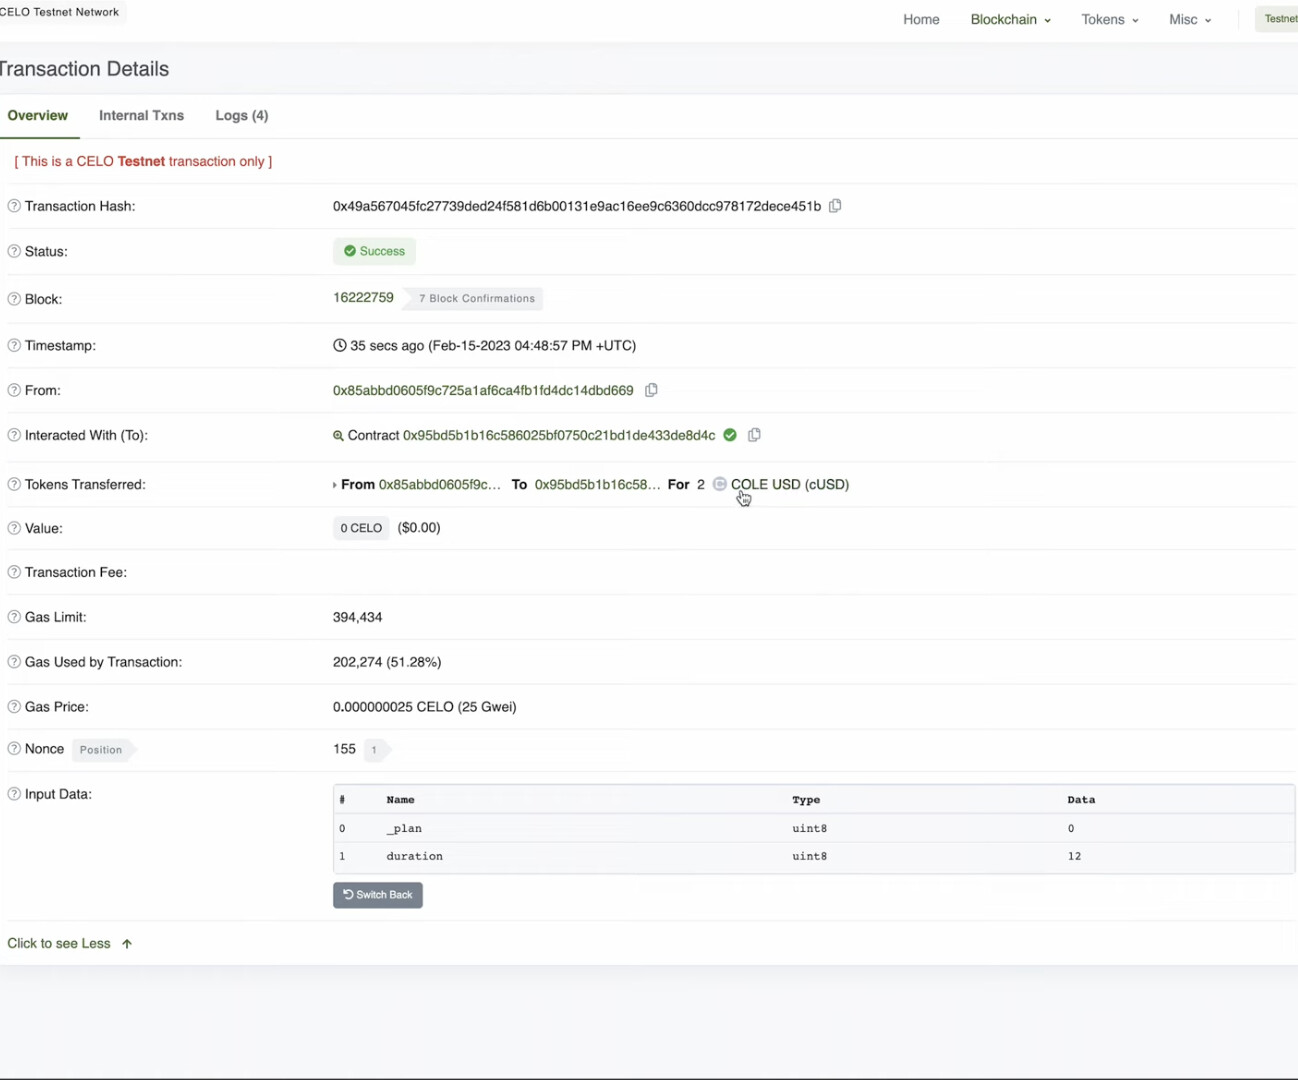
    function subscribe(Plan _plan, uint8 duration) public whenNotPaused {
        require(uint8(_plan) <= 2, "Invalid plan");
        require(duration > 0, "Invalid duration");
        require(duration <= 12, "Invalid duration");
        require(!activeSubscriptions[msg.sender], "Already subscribed");

        uint256 requiredAllowance = plans[_plan].price * duration;

        //Check if the user has approved the contract to spend the required amount, if not revert
        require(
            IERC20(subscriptionToken).allowance(msg.sender, address(this)) >=
                requiredAllowance,
            "Insufficient allowance"
        );

        //Check that we can charge for the first month
        require(
            IERC20(subscriptionToken).balanceOf(msg.sender) >=
                plans[_plan].price,
            "Insufficient balance"
        );

        subscriptions[msg.sender] = Subscription({
            plan: _plan,
            price: plans[_plan].price,
            startDate: block.timestamp,
            nextCharge: block.timestamp + plans[_plan].duration,
            endDate: block.timestamp + plans[_plan].duration * duration,
            active: true
        });

        _charge(msg.sender);

        activeSubscriptions[msg.sender] = true;

        emit SubscriptionCreated(msg.sender, _plan);
    }

    function _charge(address susbcriber) internal {
        require(
            IERC20(subscriptionToken).transferFrom(
                susbcriber,
                address(this),
                subscriptions[susbcriber].price
            ),
            "Transfer failed"
        );

        //Set the next charge date
        subscriptions[susbcriber].nextCharge =
            block.timestamp +
            plans[subscriptions[susbcriber].plan].duration;

        if (
            subscriptions[susbcriber].nextCharge >
            subscriptions[susbcriber].endDate
        ) {
            _cancel(susbcriber);
        }

        emit SubscriptionCharged(
            susbcriber,
            subscriptions[susbcriber].plan,
            subscriptions[susbcriber].nextCharge
        );
    }

    function _cancel(address subscriber) internal {
        activeSubscriptions[subscriber] = false;
        delete subscriptions[subscriber];

        emit SubscriptionCancelled(subscriber);
    }

    function charge(address subscriber) public onlyOwner whenNotPaused {
        require(activeSubscriptions[subscriber], "Not subscribed");
        require(
            subscriptions[subscriber].nextCharge <= block.timestamp,
            "Not time to charge yet"
        );

        require(
            IERC20(subscriptionToken).allowance(subscriber, address(this)) >=
                subscriptions[subscriber].price,
            "Insufficient allowance"
        );
        _charge(subscriber);
    }

    function withdrawSubscriptionToken(
        address to,
        uint256 amount
    ) public onlyOwner {
        require(
            IERC20(subscriptionToken).transfer(to, amount),
            "Transfer failed"
        );
    }
}
4 Likes

Compile the contract, open up a terminal and execute these commands

npx hardhat compile

If there are no errors, you are good to go :kissing_closed_eyes:

Prefer Video

If you would rather learn from a video, we have a recording available of this tutorial on our YouTube. Watch the video by clicking on the screenshot below.

Video Tutorial

Finally we have successfully completed our payment subscription UI and the contract and the next step is to write test for our smart contract which would be done in the next tutorial.

Section 2

Congratulations on making it to this section! You’ve already read about smart contracts and UI using Nextjs and Tailwind in the first part of our tutorial. Now, we’ll delve deeper into writing and verifying the smart contract by providing step-by-step instructions in this article.

Prerequisites

To proceed, it’s required that you finish the UI and smart contract tutorial, along with the associated unit tests. Further information on unit tests can be found here.

Step 1

Navigate into your test folder and create a new file called subscription-test.js

Head over to Hardhat Network Helper which gives you the ability to mine blocks up to a certain timestamp or block number. To install paste the below command into your terminal

yarn add --dev @nomicfoundation/hardhat-network-helpers

Once the initial task is completed, we must organize our test cases in a way that simplifies identifying what needs to be tested and the expected results. Below are the test cases we will use for this project:

  • Do we have three plans?
  • Is the first plan what we expect?
  • Is the third plan what we expect?
  • Is the second plan what we expect?
  • Can we subscribe to the right plan?
  • Can we subscribe to the wrong plan?
  • Can we subscribe to the same plan twice?
  • Can a user subscribe to a plan without enough allowance?
  • Can a user be charged 11 more times after the first charge?
  • Can a user subscribe to a plan without enough balance for the first charge?

To run the first step add the following code to your subscription-test.js file

const { expect, assert } = require("chai");
const { ethers } = require("hardhat");
const helpers = require("@nomicfoundation/hardhat-network-helpers");

const oneHour = 60 * 60 * 1;

before(async function () {
  const [deployer, accountA, accountB, accountC] = await ethers.getSigners();
  const MockCUSD = await ethers.getContractFactory("MockCUSD");
  const cUSD = await MockCUSD.deploy();
  await cUSD.deployed();

  const PaymentSubscription = await ethers.getContractFactory(
    "PaymentSubscription"
  );
  const paymentSubscription = await PaymentSubscription.deploy(cUSD.address);

  await paymentSubscription.deployed();

  this.paymentSubscription = paymentSubscription;
  this.cUSD = cUSD;
  this.deployer = deployer;
  this.accountA = accountA;
  this.accountB = accountB;
  this.accountC = accountC;
});

describe("PaymentSubscription", function () {
  it("Should have Basic plan", async function () {
    const basicPlan = await this.paymentSubscription.plans(0);
    expect(basicPlan.price).to.equal(ethers.utils.parseEther("2"));
    expect(basicPlan.duration).to.equal(oneHour);
  });
});

In your terminal, run this command:

 npx hardhat test test/subscription-test.js --network hardhat

You should see the following result in your terminal

Also, we need to try this for our premium plan and enterprise plan. In that same file add the following code

it("Should have Premium plan", async function () {
  const premiumPlan = await this.paymentSubscription.plans(1);
  expect(premiumPlan.price).to.equal(ethers.utils.parseEther("5"));
  expect(premiumPlan.duration).to.equal(oneHour);
});

it("Should have Enterprise plan", async function () {
  const enterprisePlan = await this.paymentSubscription.plans(2);
  expect(enterprisePlan.price).to.equal(ethers.utils.parseEther("12"));
  expect(enterprisePlan.duration).to.equal(oneHour);
});

and run the same command in your terminal. Your terminal should look like this if properly executed.

Step 2

Also, we want a user to be able to subscribe to a 12-month plan. To do this, we need to add the following code after the enterprise plan function

it("Should allow user to subscribe to a 12 months plan", async function () {
  const basic = await this.paymentSubscription.plans(0);
  await this.cUSD.approve(
    this.paymentSubscription.address,
    basic.price.mul(ethers.BigNumber.from(12))
  );
  await this.paymentSubscription.subscribe(basic.plan, 12);
  const subscription = await this.paymentSubscription.subscriptions(
    this.deployer.address
  );
});

Your final code should look like this.

const { expect, assert } = require("chai");
const { ethers } = require("hardhat");
const helpers = require("@nomicfoundation/hardhat-network-helpers");

const oneHour = 60 * 60 * 1;

before(async function () {
  const [deployer, accountA, accountB, accountC] = await ethers.getSigners();
  const MockCUSD = await ethers.getContractFactory("MockCUSD");
  const cUSD = await MockCUSD.deploy();
await cUSD.deployed();

  const PaymentSubscription = await ethers.getContractFactory(
    "PaymentSubscription"
  );
  const paymentSubscription = await PaymentSubscription.deploy(cUSD.address);

  await paymentSubscription.deployed();

  this.paymentSubscription = paymentSubscription;
  this.cUSD = cUSD;
  this.deployer = deployer;
  this.accountA = accountA;
  this.accountB = accountB;
  this.accountC = accountC;
});

describe("PaymentSubscription", function () {
  it("Should have Basic plan", async function () {
    const basicPlan = await this.paymentSubscription.plans(0);
    expect(basicPlan.price).to.equal(ethers.utils.parseEther("2"));
    expect(basicPlan.duration).to.equal(oneHour);
  });

it("Should allow user to subscribe to a 12 months plan", async function () {
    const basic = await this.paymentSubscription.plans(0);
await this.cUSD.approve(
      this.paymentSubscription.address,
      basic.price.mul(ethers.BigNumber.from(12))
    );
await this.paymentSubscription.subscribe(basic.plan, 12);
const subscription = await this.paymentSubscription.subscriptions(
      this.deployer.address
    );

Run the same command in your terminal, and your terminal should give you the following output below:

However, we need to confirm that the time a user subscribes is the actual current block time and that a user can subscribe to the wrong plan or the same plan twice. Paste the following code after the last function.

const currentTime = (await ethers.provider.getBlock("latest")).timestamp;

    expect(subscription.plan).to.equal(basic.plan);
    expect(subscription.startDate).to.equal(ethers.BigNumber.from(currentTime));
    expect(subscription.endDate).to.equal(
      ethers.BigNumber.from(currentTime + 12 * oneHour)
    );
    expect(subscription.nextCharge).to.equal(
      ethers.BigNumber.from(currentTime + oneHour)
    );
  });

it("Should not allow user to subscribe to the wrong plan", async function () {
    await expect(this.paymentSubscription.subscribe(3, 12)).to.be.rejectedWith(
      Error
    );
  });

  it("Should not allow user to subscribe to the same plan twice", async function () {
    const basic = await this.paymentSubscription.plans(0);

    await this.cUSD.approve(
      this.paymentSubscription.address,
      basic.price.mul(ethers.BigNumber.from(12))
    );

    expect(
      this.paymentSubscription.subscribe(basic.plan, 12)
    ).to.be.revertedWith("Already subscribed");
  });

Run the same command in your terminal, and you should get the following results if executed correctly:

Step 3

Finally, we would also test to see if a user could subscribe to a plan without enough allowance, be charged 11 more times after the first charge, and subscribe to a plan without enough balance for the first charge. Add the following code after your last test

it("Should not allow user to subscribe to a plan without enough allowance", async function () {
    const basic = await this.paymentSubscription.plans(0);

    await expect(
      this.paymentSubscription.connect(this.accountA).subscribe(basic.plan, 12)
    ).to.be.revertedWith("Insufficient allowance");
  });

  it("Should not allow user to subscribe to a plan without enough balance for the first charge", async function () {
    const basic = await this.paymentSubscription.plans(0);

    await this.cUSD
      .connect(this.accountA)
      .approve(
        this.paymentSubscription.address,
        basic.price.mul(ethers.BigNumber.from(12))
      );

    await expect(
      this.paymentSubscription.connect(this.accountA).subscribe(basic.plan, 12)
    ).to.be.revertedWith("Insufficient balance");
  });

  it("Should allow user to be charged 11 more times after the first charge", async function () {
    await this.cUSD.mint(this.accountC.address, ethers.utils.parseEther("24"));

    const basic = await this.paymentSubscription.plans(0);

    await this.cUSD
      .connect(this.accountC)
      .approve(
        this.paymentSubscription.address,
        basic.price.mul(ethers.BigNumber.from(12))
      );

    await this.paymentSubscription
      .connect(this.accountC)
      .subscribe(basic.plan, 12);

    for (let monthsCharged = 2; monthsCharged <= 12; monthsCharged++) {
      const currentBal = await this.cUSD.balanceOf(this.accountC.address);
      const subscription = await this.paymentSubscription.subscriptions(
        this.accountC.address
      );

      await helpers.time.increase(oneHour);

      console.table({
        monthsCharged,
        currentBal: ethers.utils.formatEther(currentBal),
        nextCharge: ethers.utils.formatEther(subscription.nextCharge),
      });

      await this.paymentSubscription
        .connect(this.deployer)
        .charge(this.accountC.address);
    }

    expect(await this.cUSD.balanceOf(this.accountC.address)).to.equal(0);

    const subscription = await this.paymentSubscription.subscriptions(
      this.accountC.address
    );
    const active = await this.paymentSubscription.activeSubscriptions(
      this.accountC.address
    );

    expect(subscription.nextCharge).to.equal(0);
    expect(active).to.equal(false);
  });
});

Run the same command in your terminal, and you should get the following results if executed correctly:

Awesome! We now have all our tests working, and the next thing we need to do is verify our contract and run a test coverage. To do this head over to solidity coverage and run the command below in your terminal

yarn add solidity-coverage --dev

Require the plugin in hardhat.config.js by pasting this code

require("solidity-coverage");

In your terminal run,

npx hardhat coverage --testfiles "test/registry/*.ts" --network hardhat

To verify your contract,

  • Head over to Celoscan
  • Login or Signup
  • Click on the API-KEYs menu on the sidebar and generate a key
  • Paste the key in the space available for it in the .env file

In your terminal run

npx hardhat deploy --network alfajores

To deploy, open up deploy.js file in the deploy folder and paste the following code inside

module.exports = async ({ getNamedAccounts, deployments }) => {
  const { deploy } = deployments;
  const { deployer } = await getNamedAccounts();

  const cUSD = await deploy("MockCUSD", {
    from: deployer,
    log: true,
  });

  console.log("cUSD deployed to:", cUSD.address);

  await deploy("PaymentSubscription", {
    from: deployer,
    args: [cUSD.address],
    log: true,
  });
};

module.exports.tags = ["MockCUSD"];

In your terminal, run

yarn run deploy

And to verify our contracts we need to use the format below.

npx hardhat verify <CONTRACT_ADDRESS> <CONSTRUCTOR_ARGS> --network alfajores

To verify our subscription payment smart contract that was deployed above, the command to run will be:

npx hardhat hardhat verify 0x95BD5b1B16C586025bF0750c21bd1de433de8D4c 0xEb3345B25d59Ad1dD153DAf883b377258E8515F9 --network alfajores

If you prefer a video, you can click on the screenshot below and watch the video tutorial. In the next article, we will be setting up Subgraph to query subscription details from the OpenZeppelin Defender Autotask script.

Video Tutorial

Section 3

Congrats on reaching this section! You’ve learned about smart contracts, UI with Nextjs and Tailwind, testing, and contract verification in the past two tutorials. In this article, we will provide step-by-step instructions for setting up a subgraph that queries subscription details from the OpenZeplin Defender autotask script. This will help you better understand the process.

Prerequisites

  • Create an account on the subgraph
  • Click on sign in with GitHub
  • Install the graph globally on your local machine using npm. In your terminal run

In the project folder run:

yarn subgraphs:get-abi

Step 1

To initialize the graph in our project, cd into the subgraph package folder and run

graph init

Choose Ethereum for protocol, and hosted services, and add your GitHub username as your subgraph name.

Add celo-alfajores as the network, and you should see the output below if executed successfully.

In our subgraph, a new folder called ebook-payment-subscription-platform has been created or in your own case whatever you named your folder name, Inside the folder, open the schema.graphql file and paste the following code inside.

type Plan @entity(immutable: true) {
  id: Bytes!
  plan: Int!
  price: BigInt!
  duration: BigInt!
  subscriptions: [SubscriptionP!]! @derivedFrom(field: "plan")
  blockNumber: BigInt!
  blockTimestamp: BigInt!
  transactionHash: Bytes!
}


type SubscriptionP @entity(immutable: true) {
  id: Bytes!
  subscriber: Bytes! # address
  plan: Plan!
  nextCharge: BigInt!
  endDate: BigInt!
  blockNumber: BigInt!
  blockTimestamp: BigInt!
  transactionHash: Bytes!
}

Then in your subgraph.yaml file delete the default code and paste the following code

specVersion: 0.0.5
schema:
  file: ./schema.graphql
dataSources:
  - kind: ethereum
    name: PaymentSubscription
    network: celo-alfajores
    source:
      address: "0x95BD5b1B16C586025bF0750c21bd1de433de8D4c"
      abi: PaymentSubscription
    mapping:
      kind: ethereum/events
      apiVersion: 0.0.7
      language: wasm/assemblyscript
      entities:
        - Plan
        - SubscriptionP
      abis:
        - name: PaymentSubscription
          file: ./abis/PaymentSubscription.json
      eventHandlers:
        - event: PlanCreated(uint8,uint256,uint256)
          handler: handlePlanCreated
        - event: SubscriptionCancelled(indexed address)
          handler: handleSubscriptionCancelled
        - event: SubscriptionCharged(indexed address,uint8,uint256)
          handler: handleSubscriptionCharged
        - event: SubscriptionCreated(indexed address,uint8)
          handler: handleSubscriptionCreated
      file: ./src/payment-subscription.ts

In your terminal run

graph codegen

You should see the following output

Lets proceed to doing dome cleanups in our file , navigate to the src folder and open paymentsubscription.ts file, delete the default code and paste the following

import { BigInt, Bytes } from "@graphprotocol/graph-ts";
import {
  PlanCreated as PlanCreatedEvent,
  SubscriptionCancelled as SubscriptionCancelledEvent,
  SubscriptionCharged as SubscriptionChargedEvent,
  SubscriptionCreated as SubscriptionCreatedEvent,
  PaymentSubscription as PaymentSubscriptionContract,
  PaymentSubscription__subscriptionsResult,
} from "../generated/PaymentSubscription/PaymentSubscription";
import { Plan, SubscriptionP as Subscription } from "../generated/schema";

export function handlePlanCreated(event: PlanCreatedEvent): void {
  let entity = new Plan(
    event.transaction.hash.concatI32(event.logIndex.toI32())
  );

  entity.plan = event.params.plan;
  entity.price = event.params.price;
  entity.duration = event.params.duration;

  entity.blockNumber = event.block.number;
  entity.blockTimestamp = event.block.timestamp;
  entity.transactionHash = event.transaction.hash;

  entity.save();
}

export function handleSubscriptionCancelled(
  event: SubscriptionCancelledEvent
): void {
  let entity = Subscription.load(event.params.subscriber);

  if (entity == null) {
    return;
  }

  entity.nextCharge = BigInt.fromI32(0);
  entity.endDate = BigInt.fromI32(0);

  entity.save();
}

export function handleSubscriptionCharged(
  event: SubscriptionChargedEvent
): void {
  let entity = Subscription.load(event.params.subscriber);

  if (entity == null) {
    entity = new Subscription(event.params.subscriber);

    let paymentSubscriptionContract = PaymentSubscriptionContract.bind(
      event.address
    );
    let subscription = paymentSubscriptionContract.subscriptions(
      event.params.subscriber
    );

    entity.plan = Bytes.fromI32(subscription.getPlan());
    entity.subscriber = event.params.subscriber;
    entity.endDate = subscription.getEndDate();
  }

  entity.nextCharge = event.params.nextCharge;

  entity.blockNumber = event.block.number;
  entity.blockTimestamp = event.block.timestamp;
  entity.transactionHash = event.transaction.hash;

  entity.save();
}

export function handleSubscriptionCreated(
  event: SubscriptionCreatedEvent
): void {
  let entity = new Subscription(event.params.subscriber);

  entity.subscriber = event.params.subscriber;

  let paymentSubscriptionContract = PaymentSubscriptionContract.bind(
    event.address
  );
  let subscription = paymentSubscriptionContract.subscriptions(
    event.params.subscriber
  );

  entity.plan = Bytes.fromI32(subscription.getPlan());
  entity.endDate = subscription.getEndDate();
  entity.nextCharge = subscription.getNextCharge();

  entity.blockNumber = event.block.number;
  entity.blockTimestamp = event.block.timestamp;
  entity.transactionHash = event.transaction.hash;

  entity.save();
}

Step 2

The next action is to upload our subgraph , Head over to your dashboard and create a subgraph.

in your terminal run

graph auth --product hosted-service<the number generated for you>
graph deploy --product hosted-service<yourname-subgraphname>

You have successfully setup subgraph to query subscription details from openzepplin defender

If you prefer a video, you can click on the screenshot below and watch the video tutorial. In the next article, we will Connect UI to Smart Contract & Setup Defender Admin, Replay & Autotask

Video Tutorial

Final Section

Introduction

Congrats on reaching this section! You’ve learned about smart contracts, UI with Nextjs and Tailwind, testing, a contract verification in the past three tutorials. In this article, we will provide step-by-step instructions on how to Connect UI to Smart Contract & Setup Defender Admin, Replay & Autotask. This will help you better understand the process.

Prerequisites

  • Create an account on the subgraph
  • Click on sign in with GitHub
  • Install the graph globally on your local machine using npm. In your terminal run

Step 1

To begin, paste the following code in your index.tx file

import React, { useEffect, useState } from "react";
import PaymentCard from "../components/PaymentCard";
import {
  abi as psAbi,
  address as psAddress,
} from "@ebook-payment-subscription-platform/hardhat/deployments/alfajores/PaymentSubscription.json";
import { useCelo } from "@Celo_Academy/react-celo";
import { parseEther } from "ethers/lib/utils.js";

const plans = {
  0: { name: "Basic", price: 2 },
  1: { name: "Premium", price: 5 },
  2: { name: "Enterprise", price: 12 },
};

export default function Home() {
  const subscriptionToken = "0xEb3345B25d59Ad1dD153DAf883b377258E8515F9";
  const [activePlan, setActivePlan] = useState(null);
  const { kit, address } = useCelo();
  const paymentSubscriptionContract = new kit.connection.web3.eth.Contract(
    psAbi,
    psAddress
  );
  const cUsdContract = new kit.connection.web3.eth.Contract(
    [
      {
        inputs: [
          {
            internalType: "address",
            name: "spender",
            type: "address",
          },
          {
            internalType: "uint256",
            name: "amount",
            type: "uint256",
          },
        ],
        name: "approve",
        outputs: [
          {
            internalType: "bool",
            name: "",
            type: "bool",
          },
        ],
        stateMutability: "nonpayable",
        type: "function",
      },
    ],
    subscriptionToken
  );

  const subscribeToPlan = async (plan) => {
    try {
      const tx = await cUsdContract.methods
        .approve(
          psAddress,
          parseEther((plans[plan].price * 12).toString()).toHexString()
        )
        .send({ from: address });

      if (tx.status) {
        const tx = await paymentSubscriptionContract.methods
          .subscribe(plan, 12)
          .send({ from: address });

        if (tx.status) {
          setActivePlan(plan);
        }
      }
    } catch (error) {
      console.log(error);
    }
  };

  useEffect(() => {
    const getActivePlan = async () => {
      const plan = await paymentSubscriptionContract.methods
        .subscriptions(address)
        .call();

      if (plan.endDate !== "0") {
        setActivePlan(parseInt(plan.plan));
      }
    };

    getActivePlan();
  }, [address]);

  return (
    <div className="space-y-8 lg:grid lg:grid-cols-3 sm:gap-6 xl:gap-10 lg:space-y-0">
      <div className="flex">
        <PaymentCard
          planName={"Basic"}
          active={activePlan == 0}
          price={2}
          onClick={() => subscribeToPlan(0)}
        />
      </div>
      <div className="flex">
        <PaymentCard
          planName={"Premium"}
          active={activePlan == 1}
          price={5}
          onClick={() => subscribeToPlan(1)}
        />
      </div>
      <div className="flex">
        <PaymentCard
          planName={"Enterprise"}
          active={activePlan == 2}
          price={12}
          onClick={() => subscribeToPlan(2)}
        />
      </div>
    </div>
  );
}

Import the mock cUSD token we created with its contract address

To test the UI , in your terminal run

yarn run dev

and click on subscribe, your metamask should pop up and you should see the output below

Sign the transaction and once succesfully executed, the subscribe button should change to unsubscribe.

Verify your contract on celoscan and you should see your transaction.

Step 2

Head over to openzepplin, click on defender and sign up. Then click on add a contract

  • name : EbookSPP
  • network : celo alfajores
  • address : “your contract address”

NOTE: it might throw an error saying “unable to fetch abi” , copy and paste the contract abi and click on create

Step 3

Next we create a relay. A relay is like a private key that helps in creating a wallet that can be used like a relayer to interact with the smart contract. You can read more on relayer here.

To create a relayer follow these steps below:

  • click on relayer on the side bar
  • name : Ebook Relayer SPP
  • network : Celo alfajores

then click on create.
send some celo to your relayer from your wallet.

Step 4

Transfer the ownership of the contract to the relayer, I will strongly advice that you watch the video tutorial link that would be attached at the end of the article from this step because it is easier to graps and understand.

Make sure you go through the youtube tutorial here for the last part of the project.

Thank you for making it through from the first part to the final part.

Conclusion

By now, you must have gotten the idea of how you can build automated payment subscription platform for charging your customer in crypto (CUSD). You have learn 4 major things; how to write test, how to deploy and query a subgraph, what a relayer is and finally how to automate things in a smart contract.

About Author

Oluwafemi Alofe is a Blockchain developer with 3 years of applicable knowledge and 8 years of total experience as a Software engineer. He has written and deployed vulnerability-free smart contracts as a blockchain developer on a variety of blockchains, including but not limited to Ethereum, BCS, and Celo. Oluwafemi has a strong interest in developing distributed systems, and continues to learn new things every day to stay current with technological advancements.

He is has two Udemy courses on solidity development with over 6,300 student enrolled and also a book on Amazon KDP for PHP and Laravel Developers.

He’s currently a platform owner at myco.io, first world, watch to earn platform with over 1 Million users.

Connect with Oluwafemi on Twitter or Linkedin.

6 Likes

Nice piece :100:

4 Likes

This is a nice piece, hope to see more like this :clinking_glasses:

5 Likes

Great work @oluwafemialofe :tada:

3 Likes

Good one bro :clap:

3 Likes

Hello, @oluwafemialofe,

Your tutorial is good. But I have a few concerns:

  • There are a couple of grammatical errors and issues with point organization you need to fix. See the example below.

in the section where you wrote this:

In the web2 world, its common place to offer subscription services and allow your customer link a debit card so you can charge them periodically for the time of thier subscription. With the advert of stable curreny and merchant accepting them alongside exisiting payment method such as Paypal and card, thier needs to be full compatibilty of auto payment charge.

You can view the errors associated with the paragraphs in the below image.

image

Solutions like Grammarly can help you write better. If you need to write, you can leverage the writing environment or editor in this space since it has Grammarly installed and it is free to use.
Using Grammarly to fix the errors in the paragraphs above, you now have a well-formatted result thus:

In the web2 world, it is common to offer subscription services and allow your customer to link a debit card so you can charge them periodically for the time of their subscription. With the advent of a stable currency and merchants accepting them alongside existing payment methods such as Paypal and card, there needs to be full compatibility of auto payment charges

Secondly, the arrangement of your tutorials is disorganized. Placing the second chapter in the comment of the first one is considered not a good practice. Rather, continue the next section or steps in the first one or simply create a new space entirely for the second one with its reference embedded in the first series.

4 Likes

Thanks @bobelr for pointing out the errors.

4 Likes

I have been following you and its obvious youre a good teacher.
Your dedication to excellence is palpable sir.
Please try to fix the issues pointed out earlier.

6 Likes

@oluwafemialofe After the callout, seems you’re not paying attention to fixing the highlighted issues here, I suggest it needs to be flagged for moderation. @Celo_Academy @ishan.pathak2711

4 Likes

Thanks, @EmiriDbest , I’ve been on a break from extra curricula work but am back now. I saw your comments alongside others, too. I will take them up and fix them today, mate.

Cheers

3 Likes

Thanks man for your contribution to the web3 ecosystem in general.

3 Likes

Great tutorial. Thanks

2 Likes

Hi @bobelr ,

Thanks for pointing out the grammar error. I am fixing that now.

I don’t know if you are new to Celo Sage or started with us from the Trello board, but the articles were migrated here by the Celo Sage team, and the team added the second post as a comment. I had nothing to do with that. I am sure if its a problem, the team won’t have done so in the first place.

Keep up the good work.

3 Likes

That was not a migrated issue. It’s grammatical errors. Perhaps I suggest you use Grammarly to help you while writing. Migration may affect images but not the larger part of the content. Good to see you’re fixing it.

2 Likes

3 Likes

Oh I see that @oluwafemialofe. You’re right. I noticed it was due to migration. You can ignore that part and fix the rest. But what I did on my tutorial was to simply edit it, copy the one in the comment and merge it to the main post. You can do that as well to help your readers.

2 Likes