
Introduction
In the past years, the Non-Fungible Token category has gained popularity through the myriad of use cases and inventions influenced by virtual machines. The NFT industry witnesses liquidity counting to billions of dollars and this is only made possible through people’s creativity and sustainable blockchain networks such as Celo. As a web3 developer, as important as your role is, you need to understand NFT use cases to build a disruptive Dapp.
Prerequisites
As an extension of the previous tutorial on how to build a persistent Dapp on Celo using wagmi, I have prepared this tutorial to depict one of the many NFT use cases which we will deploy to Celo’s testnet - Alfajores. We will also build a user interface using Nextjs, react, and materialUi to interact with the Dapp. The frontend will be deployed on Fauna - a decentralized hosting service. This is an advanced tutorial, and it requires that you have a sound background in the following areas.
- Smart contract development using solidity.
- You should know Javascript and have considerable knowledge of typescript.
- For how to use hardhat for smart contract development, please refer to this and this.
Requirements
Before you proceed, please install the following tools:
- An editor. VSCode recommended.
- NodeJs version >=14.0.0. I use version 18.12.1
- Setup and configure hardhat.
What we are building
We will build a decentralized application for swapping ERC20 tokens to $Celo. Detail can be found in the readme.
The dApp will be in two parts. The first part is the smart contract that houses Dapp’s logic while the other manages the user interface.
Smart contracts
- Clone the project or use it as a template, then clone it to your computer.
git clone https://github.com/bobeu/persistent-dapp-on-celo-using-wagmi.git
- Navigate to the root folder
cd persistent-dapp-on-celo-using-wagmi/backend
- Install dependencies
yarn install
All files in the contract folder remain intact as we extend its functionalities by adding a non-fungible asset using the Openzeppelin library.
contracts
-
SwapLab.solcontains the main contract functions for adding and removing liquidity and swapping Celo’s ERC20 token for the $Celo coin. -
TestToken.solhas the asset code we will use for testing the swap contract. -
Add a new folder named
erc721under the contract folder.-
The OZ’s ERC721 contract module with path
@openzeppelin/contracts/interfaces/IERC721.solis a standard interface for interacting with non-fungible tokens on the blockchain. But we need to extend its reach so we can mint a membership token with the ability to cancel it. On the frontend, we’ll require that users own a membership nft before they can interact with the Dapp. -
contracts/interfaces/IERC721Extended.sol
// SPDX-License-Identifier: MIT pragma solidity 0.8.17; import "@openzeppelin/contracts/interfaces/IERC721.sol"; import "@openzeppelin/contracts/interfaces/IERC721Receiver.sol"; import "@openzeppelin/contracts/interfaces/IERC721Metadata.sol"; interface IERC721Extended is IERC721, IERC721Receiver, IERC721Metadata { function burn(uint256 tokenId) external returns(bool); function mint() external payable returns(bool); }-
You would notice I included separately
ERC721.solandERC721Pausable.sol. Sometimes, this is my way of doing things. You don’t have to do it my way. We can simply import the circuit-breaker extendedERC721Pausable.solin the final token deployable file. -
Membership.sol-
Import and inherit
Pausable.solandOwnable.solfrom the openzeppelin modules. -
Previously, we declared two additional function interfaces. It then becomes imperative that we implement these functions in the current file. Here, we implement the
mintandburnfunctions. -
The
notZeroAddressmodifier ensures that the target address is not empty. -
NFTs are unique properties or elements of a collection. They could share similar parents i.e be part of a collection but are never the same in properties. To introduce uniqueness, we generate a new NFT by increasing
tokenId. -
User addresses that have minted the membership nft are kept in
isMemberstorage for reference purposes. This method ensures that no address can mint twice. -
To encourage users to mint our membership nft, we have lowered the swapping fee. But they need to pay a tiny amount in order to have their membership minted. This method has introduced a vulnerability that we need to guard against. A user could mint and transfer or resell to other users. We do not want this to happen. To prevent the occurrence of such an event, we will intercept to place a barrier in the internal function by overriding
_transfer()so that no one is able to transfer membership. The right to do this is given to the owner. -
We effected the circuit breaker by implementing the
pauseandunpausefunctions.
-
// SPDX-License-Identifier: Unlicense pragma solidity 0.8.17; import "./ERC721Pausable.sol"; import "@openzeppelin/contracts/access/Ownable.sol"; contract Membership is Ownable, ERC721Pausable { error ZeroAddress(address); uint public tokenId; mapping (address => bool) public isMember; /** @dev Enforces that @param target - must not be empty address. */ modifier notZeroAddress(address target) { if(target == address(0)) revert ZeroAddress(target); _; } //Initialize state vars constructor () ERC721("SwapLab User", "SLU") { } receive() external payable { revert(); } /** @notice Mint Membership NFT Owner's privilege. o 'TokenId' must not have been minted before now. o No user can have more than one membership NFT. */ function mint() public payable returns(bool) { require(msg.value >= 1e16 wei, "Insufficient value"); require(!isMember[_msgSender()], "Already a user"); isMember[_msgSender()] = true; tokenId ++; uint tk = tokenId; (bool sent,) = owner().call{value: msg.value}(''); require(sent, "Failed"); _safeMint(_msgSender(), tk); _approve(_msgSender(), tk); return true; } ///@dev Burns 'tokenId' Note - Owner's privilege function burn(uint _tokenId) external onlyOwner returns(bool) { _burn(_tokenId); return true; } /** See ERC721 _transfer. Membership is not transferable*/ function _transfer(address from, address to, uint256 _tokenId ) internal override { require(paused() || _msgSender() == owner(), "Tansfer not alloowed"); super._transfer(from, to, _tokenId); } /** @dev Halts contract execution */ function pause() public onlyOwner { _pause(); } /** @dev Continues contract execution */ function unpause() public onlyOwner { _unpause(); } function onERC721Received( address operator, address from, uint256 _tokenId, bytes calldata data ) external override returns (bytes4) {} } -
-
Compile
npx hardhat compile

- Testing
I have modified the test file to ensure that no function runs unless the nft balance of the calling account is more significant than zero.
npx hardhat test

- Deploy
The hardhat config file already has the right configuration to enable us to deploy to the Celo testnet.
yarn deploy
Deployment artifacts are saved in the deployments folder.
Frontend
This project is NFT-gated hence users will be denied access to the Dapp interactive page unless they already owned our nft. We will build intelligence that automatically detects if users own membership nft otherwise we’ll ask them to mint first before granting them access.
Exit the current directory into the root folder and install the dependencies:
cd ..
cd frontend
yarn install
The project uses wagmi to manage the Dapp. To know how to set up the wagmi project, please refer to the previous tutorial.
We are going to modify the components/App directory. Only two files are in this folder - CardComponent.tsx and index.tsx. Both the landing and interactive pages are contained in the index file. We need to separate them so users can be routed to the landing page if their wallet is not activated otherwise they’re shown the interactive view but will be disabled if no membership is detected. Let’s separate the file as follows:
components/App/Home/index.tsx
We will transfer the content of the landing page into this file.
import React from 'react'
import Button from '@mui/material/Button';
import Stack from '@mui/material/Stack';
import Box from '@mui/material/Box';
import Typography from '@mui/material/Typography';
import Container from '@mui/material/Container';
import Link from '@mui/material/Link';
import { ConnectKitButton } from 'connectkit';

export function Home () {
  return (
    <main >
      <Box sx={{ bgcolor: '', pt: 16, pb: 6, }}>
        <Container maxWidth="md">
          <Typography
            component="h1"
            variant="h3"
            align="center"
            color="rgb(150, 150, 150)"
            gutterBottom
            mt={2}
          >
            Decentralized Token swap powered by Celo
          </Typography>
          <Typography variant="h6" align="center" color="rgba(150, 150, 150, 0.7)" paragraph>
            Exchange ERC20 compatible token for $CELO
          </Typography>
          <Typography variant="overline" align="center" color="green" paragraph>
            Built by <span style={{color: 'rgba(170, 170, 170, 0.9)'}}><a href="https://github.com/bobeu/">Isaac J.</a></span> for Celo developers - #celosage
          </Typography>
          <Stack sx={{ pt: 4 }} direction="row" spacing={2} justifyContent="center">
          <ConnectKitButton />
          <Button variant="outlined">
            <Link color="rgba(150, 150, 150, 0.8)" sx={{
              '&:hover': {
                border: 'rgba(100, 100, 100, 0.5)'
              }
            }} href="https://github.com/bobeu/feature-rich-persistent-dapp-on-celo-using-wagmi" underline='none'>Source code</Link>
          </Button>
        </Stack>

      </Container>
    </Box>
  </main>
  )
}
components/App/Mint/index.tsx
In this file, we mint new membership nft for new users. In the useEffect function, we watch for the user’s balance and compare if greater than zero to authenticate them.
The component renders a button that calls handleMint when clicked. If the operation is successful, it will be hidden and the Dapp component is rendered.
import Stack from '@mui/material/Stack';
import Button from '@mui/material/Button';
import Typography from '@mui/material//Typography';
import Container from '@mui/material//Container';
import React from 'react';
import { useAccount } from 'wagmi';
import runContractFunc from '../../apis';
import { SignUprops } from '../../../interfaces';
import { Spinner } from '../../Spinner';
import green from '@mui/material/colors/green';

const FUNC_NAME = 'mint';

export function Mint (props: SignUprops) {
  const [ loading, setLoading ] = React.useState<boolean>(false);
  const { handleClick, setauth, isUser } = props;
  const { address, isConnected, connector } = useAccount();

  React.useEffect(() => {
    const endtask = new AbortController();
    const refetchData = async() => {
      if(connector) {
        const provider = await connector?.getProvider();
        if(isConnected) {
          if(provider) {
            const bal = await runContractFunc({
              account: address,
              providerOrSigner: provider,
              functionName: 'nftBalance'
            });
            if(bal.balanceOrAllowance.toString() > '0') {
              setauth();
            }
          }
        }
      }
    }
    refetchData();
    return () => endtask.abort();
  }, [isConnected]);

  const handleMint = async() => {
    setLoading(true);
    await handleClick(FUNC_NAME);
    setLoading(false);
  }

  return (
    <Container maxWidth={isUser ? 'xs' : 'md'}>
      <Stack>
        <Typography component='button' variant='h5' color='rgba(150, 150, 150, 0.7)'>Membership Not Found</Typography>
        <Typography component='button' variant='h5' color='rgba(150, 150, 150, 0.7)'>To interact with this Dapp, Please mint membership NFT</Typography>
        <Button
          fullWidth
          variant='contained'
          endIcon={loading? <Spinner color={'white'} /> : 'Proceed to mint'}
          onClick={handleMint}
          sx={{
            background:green[700],
            color: 'whitesmoke',
            '&:hover': {
              background: 'rgba(150, 150, 150, 0.3)',
            }
          }}
        />
      </Stack>
    </Container>
  )
}
-
components/App/AppProtected/index.tsxMove the content of the previous
App/index.tsxinto this file and make the following changes.- import the
Mintcomponent. By default, if the user does not own the $SLU nft, the button components are disabled until otherwise proven true.
import getContractData from '../../apis/contractdata'; import { Mint } from '../Mint';- We dynamically hide some components based on the outcome of the
Mintcomponent usinggetOpacityfunction. Every child components in theStackcomponent are blurred out whengetOpacityreturned 0 vice versa.
const getOpacity = () => { return isUser? 1 : 0 }- Add an additional case block to the switch statement in the
afterTrxfunction that watches for ‘mint’ to be true. The nft balance from the resulting operation fromhandleClikis extracted and passed toafterTrx. Then in themintcase, we set the pass by callingsetauthif the balance is greater than zero. In your Dapp, you’d want to handle it in a manner that allows your Dapp read from a collection of nfts, and you can filter out the current user.
const afterTrx = (x:string, result: Result) => { switch (x) { case 'swap': setData(result.data); setAllowance(result.balanceOrAllowance); break; case 'approve': setAllowance(result.balanceOrAllowance); break; case 'clearAllowance': setAllowance(result.balanceOrAllowance); break; case 'addLiquidity': setData(result.data); break; case 'removeLiquidity': setData(result.data); break; case 'mint': if(result.balanceOrAllowance.toString() > '0') setauth(); break; default: setData(result.data); break; } } - import the
-
Since we reduced the swap fee in the SwapLab contract, we will affect it on the frontend. A place to do that is in the
handleClickfunction.
Reset the conditional statement that checks if functionName equals 'swap', then set the swap fee in variable value to 1e14 wei equivalent to 0.0001 Celo.
Set additional statement to check for 'mint' function, then set value to 1e16 wei. For the first time that the mint function is executed for the current user, if no error is thrown, then a membership nft is minted for the user. We can then set the pass to true.
    const handleClick = async(functionName: string, flag?:boolean) => {
    if(flag && functionName !== 'approve' && amount === 0) return alert('Please enter amount');
    if(functionName === 'addLiquidity') {
      if(value === '0') return alert('Please set value');
    }
    setLoading(true);
    const provider = await connector?.getProvider();

    try {
      const amt = BigNumber(amount);
      let val = ethers.utils.parseEther(value);
      if(functionName === 'swap') val = ethers.utils.parseEther('0.0001');
      if(functionName === 'mint') val = ethers.utils.parseEther('0.01');
      console.log("Val", val.toString())
      const result = await runContractFunc({
        functionName: functionName,
        providerOrSigner: provider,
        amount: ethers.utils.hexValue(ethers.utils.parseUnits(amt.toString())),
        cancelLoading: () => setLoading(false),
        account: address,
        value: val
      });
      if(functionName === 'mint') setAuth(true);
      afterTrx(functionName, result);

    } catch (error: any) {
      if(error) {
        const result = await runContractFunc({
          functionName: 'getData',
          providerOrSigner: provider,
        })
        afterTrx('getData', result);
        setError(error?.reason || error?.data.message || error?.message);
        setLoading(false);
        console.log("Error1", error?.reason|| error?.message || error?.data.message);
      }
    }
  }
Now, let’s run the program. In the frontend directory, run
yarn run dev
npm run dev
If everything works correctly, you should have the view as follows.
- Landing page

- Page after the provider is activated but membership nft is not yet minted, and the buttons are disabled.

- Transaction is being broadcasted.

- After nft is minted.

Deploying to decentralized hosting service
At this point, our Dapp’s frontend is ready to be deployed to a hosting service. Although there are a couple of decentralized hosting services that we could consider, I have selected to deploy to “Spheron” for its easy, simple, and faster deployment rate.
Firstly, let us understand what decentralized hosting means. Just as the name implies, it is a method of uploading or storing data to a server not owned and controlled by a central authority. Unlike centralized counterpart, decentralized service uses distributed networks most of which resemble blockchain. When files are uploaded, they’re hashed into compartments and distributed across nodes of the computer so that no single node is able to claim the monopoly of storage.
Spheron provides an easy method of deploying Dapps to developers. With a few clicks, you’re there. Read more. To deploy on either Filecoin or IPFS using Spheron, you will need to sign up on the website. Select the convenient method. It is recommended to authenticate using GitHub so as to easily extract repositories.

Thereafter, follow these steps:
- After you’re logged in, click on dashboard, then ‘New Project’ at the top right-hand corner.

- Select the repository to link and give permissions to the app.

- Connect using your favorite provider.

Note: Be sure to trust the app you are granting permission to access your GitHub account.
- Review to select the desired permission. For me, I’d prefer to allow access to selected repositories.

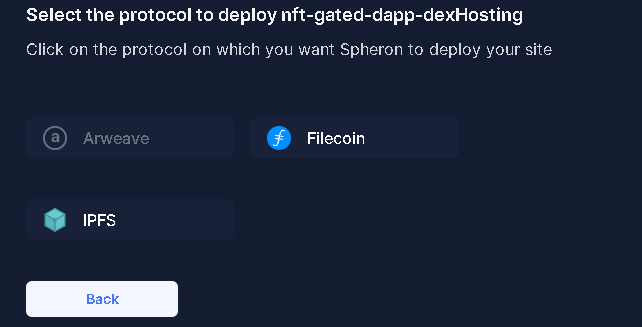
- Next step is to pick a protocol. I have selected IPFS.
- Review the deployment settings

-
In the
ROOT DIRECTORYcolumn, we will type'frontend/as the root directory to deploy from. -
Pick
Nextjsas theFRAMEWORKand leave the build command as it is. -
Under the
Node Engine, be sure to select Node version 16 and above otherwise you’d likely get a build error. Then Clickdeploy.

- While deploying, you can inspect the deploy log for the failed attempt.

- From the log, you can find the stream information such as the content hash.

- Deploy success.

Demo
This Dapp is deployed to IPFS using Spheron, and you can interact with it via this link
The complete code for this tutorial can be found here.
Conclusion
Congratulation on completing this tutorial. You’re a step away from building your dream Dapp on Celo. So far, we have learned to build a full Dapp using solidity, compile, test, and deployed to Celo Alfajores. We also build an interface for users to interact with what we’ve built. Lastly, we deployed the Dapp to a decentralized hosting service - Spheron. If you’re for more tutorials relating to Celo, here is a place to get started.
What next?
Are you thinking of launching your own project on the Celo blockchain right now? Kindly visit the developers documentation.
About the Author
Isaac Jesse , aka Bobelr is a smart contract/Web3 developer. He has been in the field since 2018, worked as an ambassador with several projects like Algorand and so on as a content producer. He has also contributed to Web3 projects as a developer.

