
Hello Developers
Welcome to today’s post, where we’ll break down a blockchain topic into bite-sized pieces to help you learn and apply your new skills in the real world. Today’s topic is Deploying on Celo with Truffle.
Here’s a list of what we’ll cover ![]()
 Step 1: Environment setup
- Step 2: Project setup
- Step 3: Write project code
- Step 4: Create and fund your account
- Step 5: Configure deployment settings
- Step 6: Compile and migrate your contract
- Step 7: Deploy your contract
- Step 8: View your deployed contract
- Step 9: Verify your smart contract
By the end of this post, you’ll be able to create, deploy, and interact with your smart contract on Celo testnet, mainnet, or localhost using Truffle.
Let’s go! ![]()
Introduction to Truffle
Truffle is a world-class development environment, testing framework, and asset pipeline for blockchains using the Ethereum Virtual Machine (EVM). By creating a Truffle project and editing a few configuration settings you can easily deploy your project on Celo.

TIP
Learn more: If you are new to Truffle check out the Truffle docs.
Step 1: Environment setup
Before getting started you’ll need to set up Celo in your local environment. You can do this on Mac or Windows and can find the details on docs.celo.org.

Celo projects include common dependencies like Nodejs, npm, nvm, yarn, git, and xCode. If you already have these installed you can follow this post to set up Celo specific dependencies.
Node v12.0.0
To build on Celo you’ll use node v12.0.0.
nvm install v12.0.0nvm use v12.0.0node --version
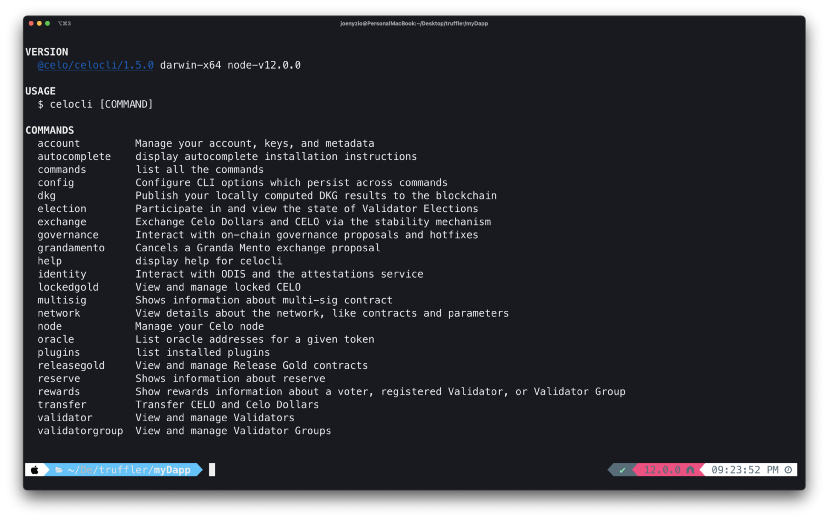
Celo Command Line Interface
The celocli lets you interact with the Celo Protocol smart contracts.
npm install -g @celo/celocli
TIP
Learn more: 17 smart contracts powering the Celo protocol
Install Truffle
Truffle lets you to develop, test, and deploy dApps on Celo.
npm install -g truffle
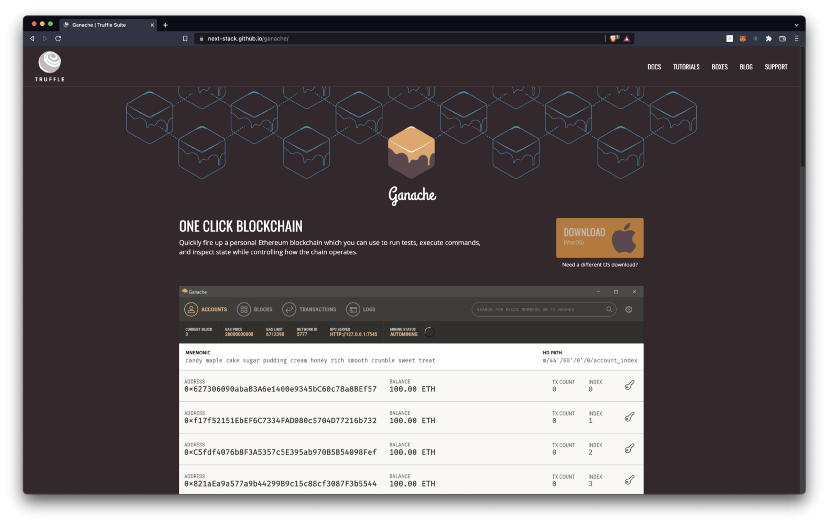
Install Ganache
Ganache UI creates a local blockchain to help you deploy and test contracts. You can install and set up the UI from their website and can find more details in the Ganache docs.
TIP
The @celo/ganache-cli is Celo’s version of Ganache. It doesn’t seem to be working for me but you can try installing it in your environment.
From the Ganache UI, create a new workspace on localhost:7545.

Step 2: Project setup
Now that you have your environment setup, you’re ready to create your project! Open your terminal to create and navigate into a project folder.
mkdir celo-truffle && cd celo-truffle

Initialize an npm project
Initialize an npm project from within the project directory.
npm init -y

Install hdwallet-provider
Truffle/hdwallet-provider lets you sign Celo transactions for addresses derived from a mnemonic or private key. You can install this now and you’ll use it later when configuring your project.
npm install @truffle/hdwallet-provider --save

Install dotenv
Dotenv is a module that loads environment variables from a .env file. Install this now and you’ll use this to import information to your Truffle configuration file.
npm install dotenv

Initialize Truffle
Initializing Truffle creates your project’s truffle environment. Use truffle init to start up your truffle project!
truffle init

Open your project
Your project is set up and you’re ready to start building! Open your project in Visual Studio code or your preferred IDE.
code .

TIP
You can launch VS Code from the command line by installing it in your shell path.
Step 3: Build your project
To build your project you’ll write a smart contract, migrations, .env, and .gitignore file. You’ll also create an account, fund it with test tokens, and connect the account to your project.
Smart contract code
Create a file named HelloCelo.sol in the /contracts folder and add the Solidity code below.
// SPDX-License-Identifier: MITpragma solidity ^0.8.3;contract HelloCelo { string public greet = "Hello Celo!";}

TIP
Learn more: Read the Solidity docs or Solidity by Example to learn more about the programming language for building smart contracts.
Create migrations file
Create a file named 2_deploy_contracts.js in the /migrations folder and add the code below.
var HelloCelo = artifacts.require('HelloCelo')module.exports = function (deployer) { deployer.deploy(HelloCelo)}

TIP
If you created a different smart contract, update the variable name, file requirement and deployment to match your new contract.
Step 4: Create and fund your account
To deploy to the test or main Celo networks, you’ll need an account that is funded with CELO tokens. In this post, you’ll get set up to deploy for free on the Celo Alfajores test network!
Create an account
If you don’t already have an account you would like to use, you can run celocli account:new from your terminal to create one for this project.
celocli account:new

TIP
Learn more: Celo CLI: A practical guide to energize your Celo toolkit
Fund your account
The Alfajores testnet faucet helps you fund your account with test tokens. Copy your address from the terminal and paste it into the site to fund your account. This should send you tokens within a few seconds.

Check account balance
If you’d like to check your new account balance, you can use celocli to make sure you received your test funds.
celocli account:balance 0xYOURADDRESS

Create .env file
A .env file will help you hide the sensitive information you need for your configuration file. Create a .env file in your root folder and add your account’s private key.
PRIVATE_KEY="5ead931ce4812310e31f84c471945b96a13098aa6dc8cf0d3f6f451a5dea56cc"

Create .gitignore file
A .gitignore file will allow you to ignore certain files if you add this project to git or GitHub. Create a .gitignore file in your root directory and add the code below to ignnore your node_modules, .DS_Store and .env files.
# dependencies/node_modules# Mac users.DS_Store#hidden files.env

TIP
See ignoring files for more information.
Step 5: Configure deployment settings
The truffle configuration file specifies the networks for your contract deployment. By default, it is set up to deploy to the Ethereum network but you can update this information to deploy to any Celo network.
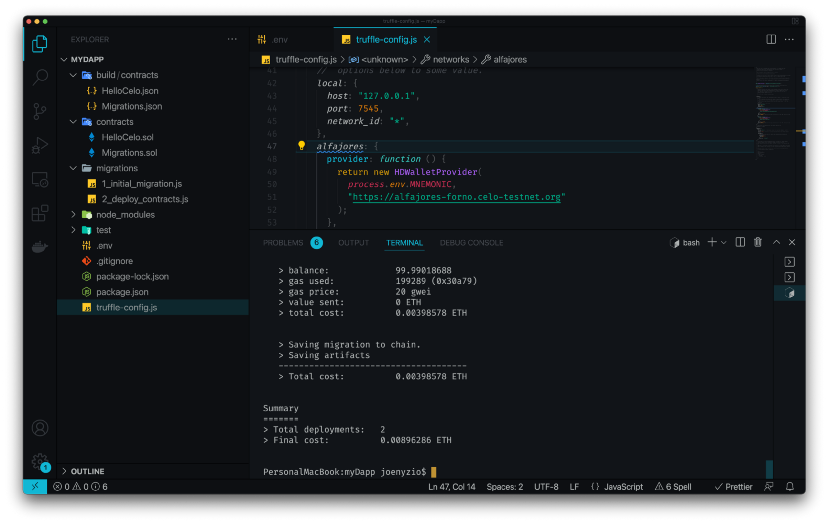
Update Truffle.config
Open truffle-config.js in a text editor and replace its contents with this Celo configuration code. This updates the truffle.config.js file to point toward Celo networks.

Local network
Creating your Ganache workspace earlier made a local blockchain at localhost:7545. The local configuration connects to this local blockchain.
local: { host: "127.0.0.1", port: 7545, network_id: "*"}
Remote node connections
If you’re not running your own node, you can connect to remote nodes using Forno. Forno is a Celo node service that lets you connect to the Celo Alfajores Test Network and Celo Mainnet.
Alfajores test network
The alfajores configuration uses Forno to connect you to Alfajores using HDWalletProvider and the private key in your .env file.
alfajores: { provider: function() { return new HDWalletProvider(process.env.MNEMONIC, "https://alfajores-forno.celo-testnet.org") }, network_id: 44787, gas: 20000000}
Celo main network
The celo configuration uses Forno to connect you to mainnet using HDWalletProvider and the private key in your .env file. This tutorial will use Alfajores but you can to deploy to the main network whenever you’d like.
celo: { provider: function() { return new HDWalletProvider(process.env.MNEMONIC, "https://forno.celo.org") }, network_id: 42220, gas: 4000000}
TIP
Learn more: To deploy to Celo Mainnet, follow 3 simple steps to connect your MetaMask wallet to Celo and deploy to this account instead of your test account.
Step 6: Compile and migrate your contract
Compiling and migrating your contract prepares the code to deploy on a Celo network. This will also help you catch any errors and debug your code.
Compile Contract
Compile the Solidity code into Ethereum bytecode. This command will compile any new or updated Solidity (.sol) contracts found in /contracts.
truffle compile

Now you should see HelloCelo.json in your /build folder.
TIP
Learn more about compiling contracts with Truffle here.
Migrate Contract
Truffle migrate compiles AND migrates your contract. In the future you can run truffle migrate to complete both steps.
truffle migrate
Step 7: Deploy your Contract
For this post, use truffle deploy --network alfajores to deploy to Alfajores but it’s easy to deploy to local or mainnet whenever you’d like!
truffle deploy --network alfajorestruffle deploy --network celotruffle deploy --network local
Deploy with — reset (optional)
You can edit contracts and redeploy at any time using the commands above. If for any reason you’d like to redeploy a contract that you didn’t edit you can use the reset flag. This will redeploy each contract to a new contract address.
truffle deploy --network NETWORK --resettruffle migrate --network NETWORK --reset
TIP
Save contract addresses for future reference. If you lose it, go to the block explorer to review your wallet transactions for contract creation and its response. Truffle saves deployment information, like transaction hashes and contract addresses, in JSON files in ./build/contracts/.
Step 8: View your deployed contract
Now that you deployed your contract, you can view it in the Celo block explorer (known as BlockScout. Copy your contract address from the terminal and navigate to the block explorer to search for your deployed contract.
- Switch to your network using the dropdown by the search bar.
- Navigate to BlockScout and select the network of your deployed contract.
- Paste your contract address from the terminal window and search for it in BlockExplorer.

TIP
Learn more about exploring the Celo network and smart contract details in BlockScout here.
Step 9: Verify your smart contract
For people to use and interact with your contract, they’ll want to be able to view the smart contract code you created. Verifying a smart contract allows people to to do this from within the Celo Block Explorer.
- Navigate to the
Codetab on theExplorerpage for your contract’s address - Click
Verify & Publishto enter the smart contract verification page
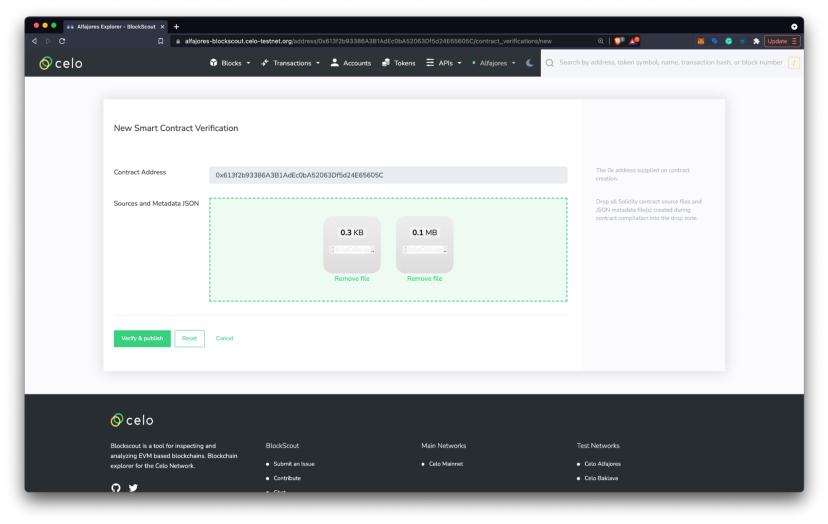
- Upload your smart contract (example:
HelloCelo.sol) and its.jsonfile (example:HelloCelo.json) found inbuild > contracts folder.

- Click
Verify & Publish - Navigate to the
Contract Address Details Pagein the block explorer to use the Code, Read Contract, and Write Contract panels to view and interact with your deployed smart contract.
Congratulations 
That wraps up today’s topic on Deploying on Celo with Truffle. You can review each of the items we covered below and check that you’re ready to apply these new skills.
Here’s a review of what we covered ![]()
- Step 1: Environment setup
- Step 2: Project setup
- Step 3: Write project code
- Step 4: Create and fund your account
- Step 5: Configure deployment settings
- Step 6: Compile and migrate your contract
- Step 7: Deploy your contract
- Step 8: View your deployed contract
- Step 9: Verify your smart contract
If you run into any issues, try reviewing the content or searching online to explore each topic in more detail. Hopefully, you’ve learned a few things about Deploying on Celo with Truffle that you can apply in the real world.
GN! ![]()