Migrating to Optics v2
This tutorial will guide you from Optics v1 to Optics v2.
The v2 Optics Bridge is live! The launch of v2 was announced in this post to the Celo Forum.
All v1 Optics Bridge users should migrate their v1 tokens to v2 tokens. Learn more here.
You have three options to choose from:
Option 1: VERY EASY Use the Mobius Migrator to swap Optics v1 for Optic v2 (1 for 1).
Option 2: MODERATE You can swap your v1 tokens to a an alternative token on Celo using Ubeswap, Mobius, or Sushiswap, then swap those tokens for Optics v2 tokens. Please note that as more tokens are bridged out of v1, it will become harder and possibly more expensive to swap your tokens.
Option 3: HARDEST You can bridge your affected v1 tokens to Ethereum or Polygon, and then back to Celo over the Optics v2 Bridge.
Depending on the available liquidity on AMMs, gas fees on the Ethereum network, and the total amount of tokens to be migrated, and the amount of effort you’re willing to spend you must choose whichever option makes the most sense.
Option 1
1 - Easily Migrate Optics Bridge Tokens to v2
The easiest way to migrate your v1 token to v2 is by using the Mobius Migrate tab.
-
Visit Mobius's Migrate tab
-
Connect your wallet.

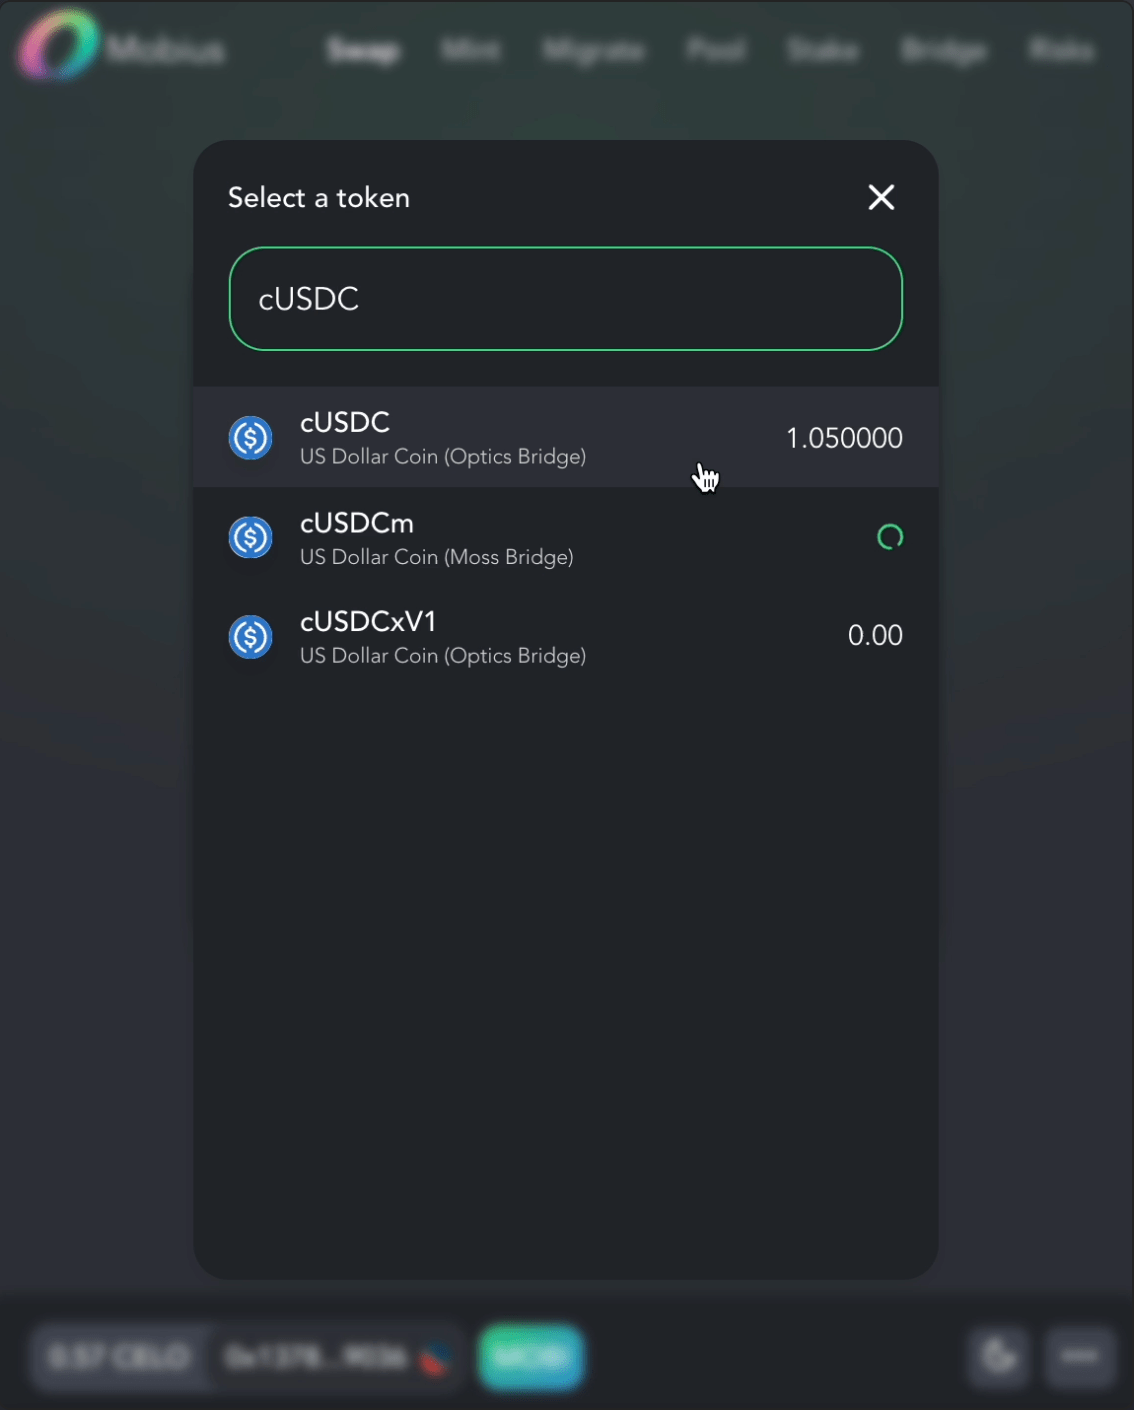
- Select cUSDCxV1, wETHxV1, or wBTCxV1 token to swap.
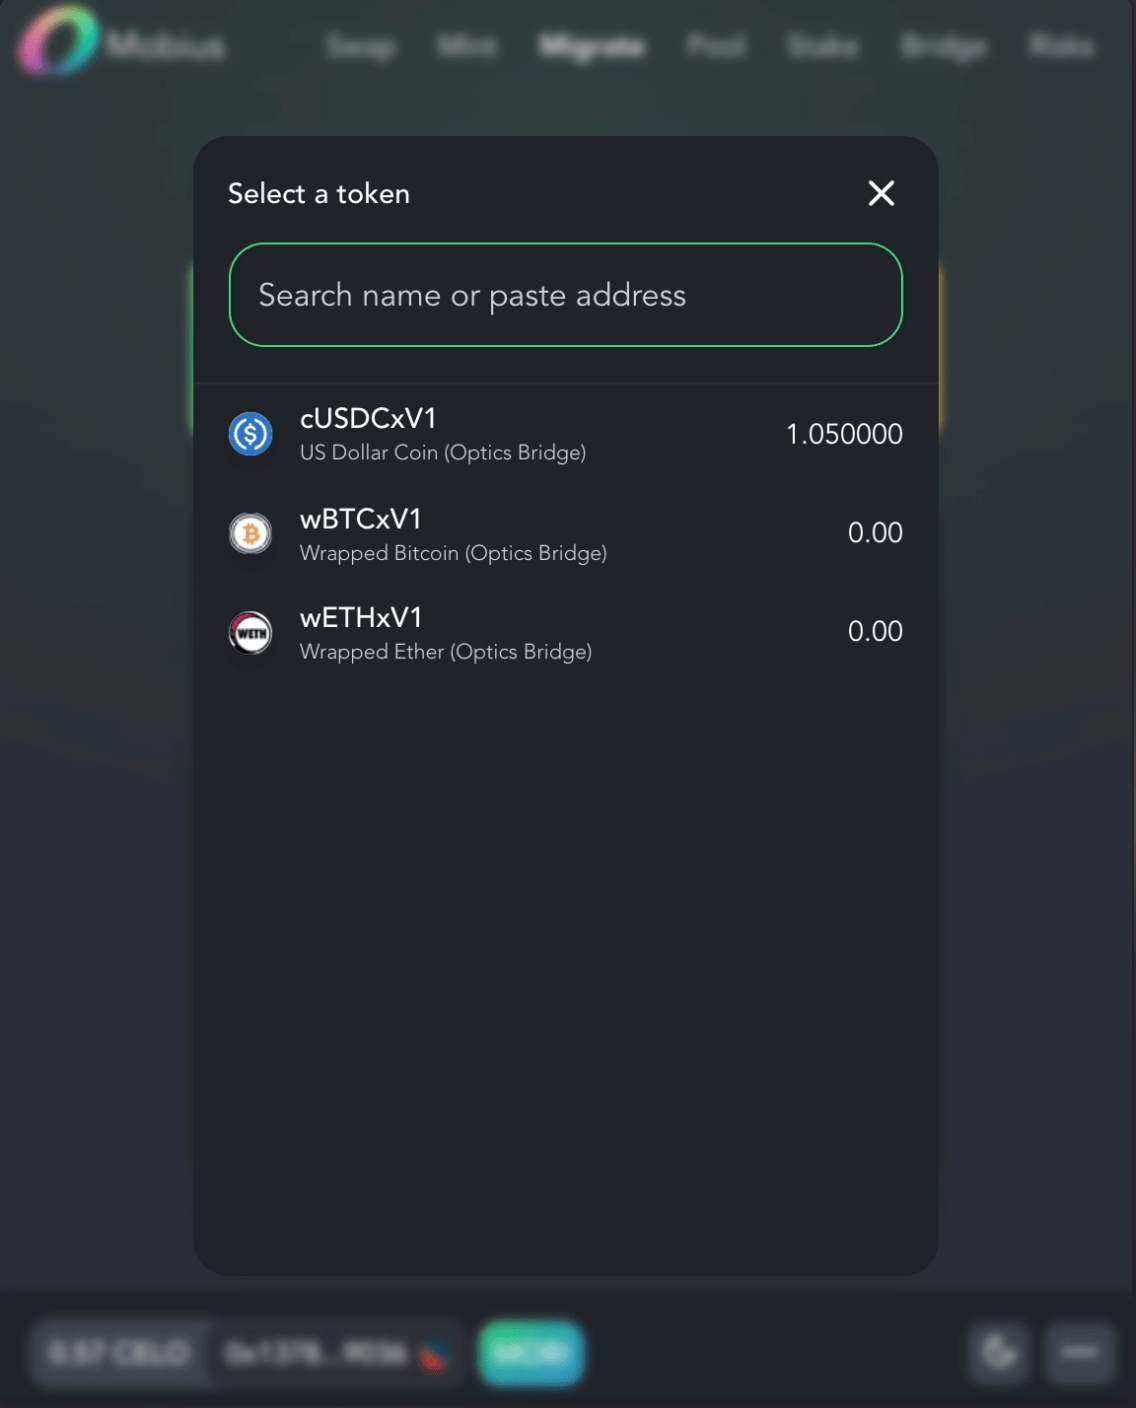
- Input the amount to swap.
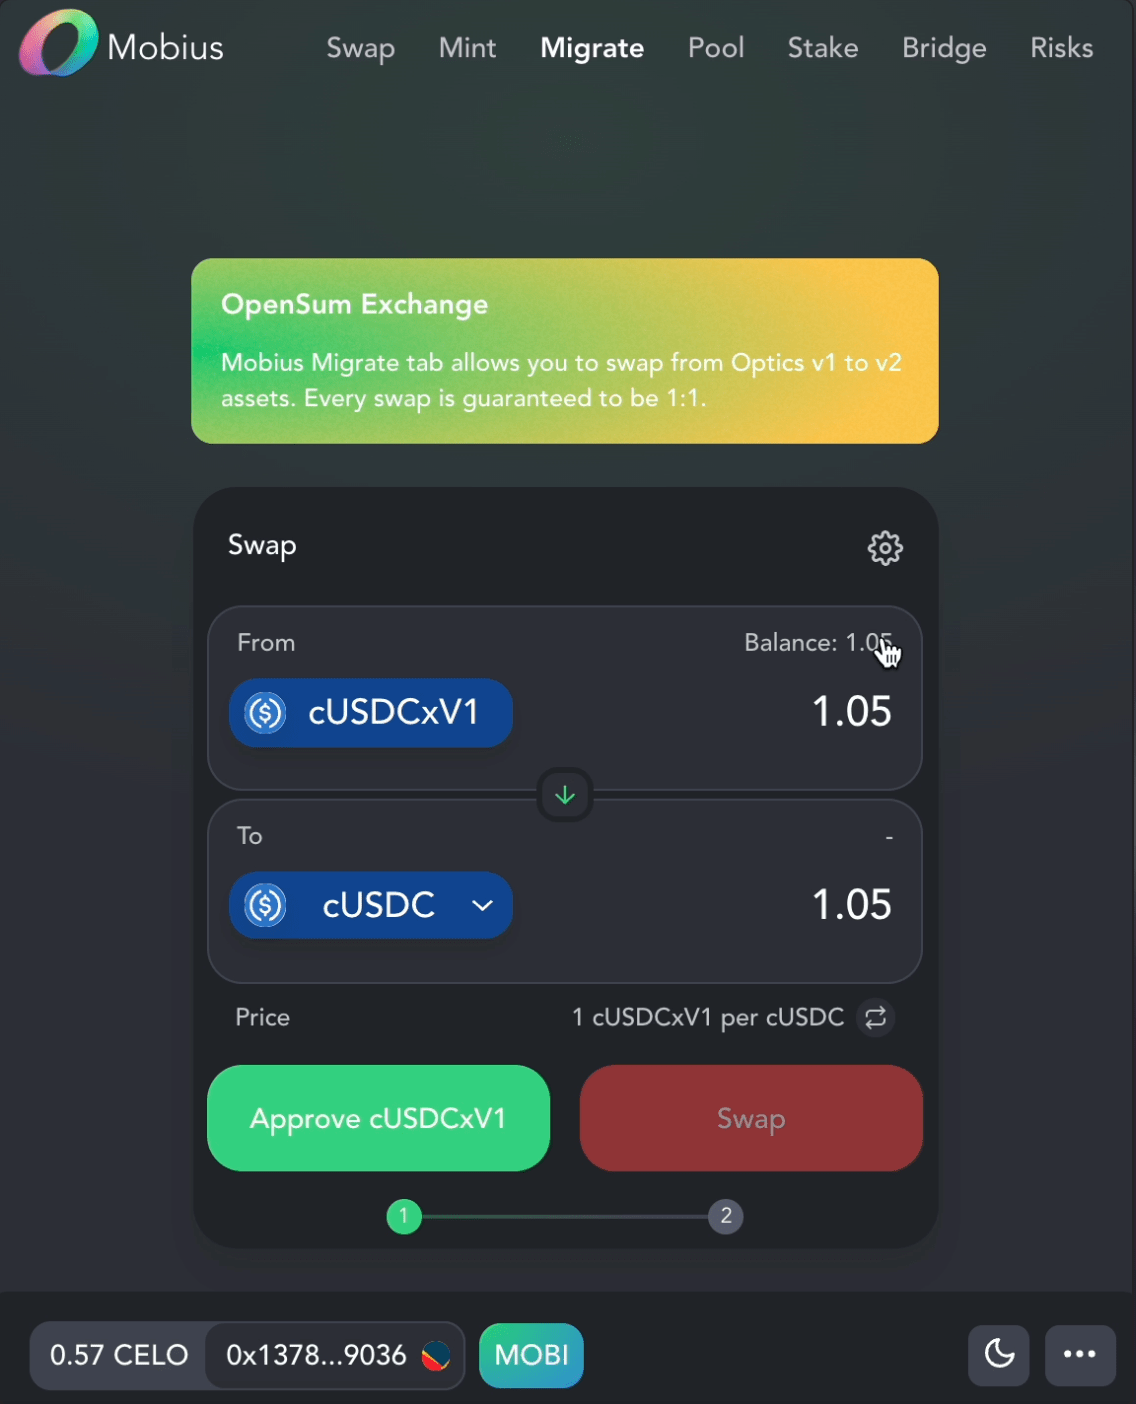
- Approve accessing your tokens (cUSDCxV1 in this example).
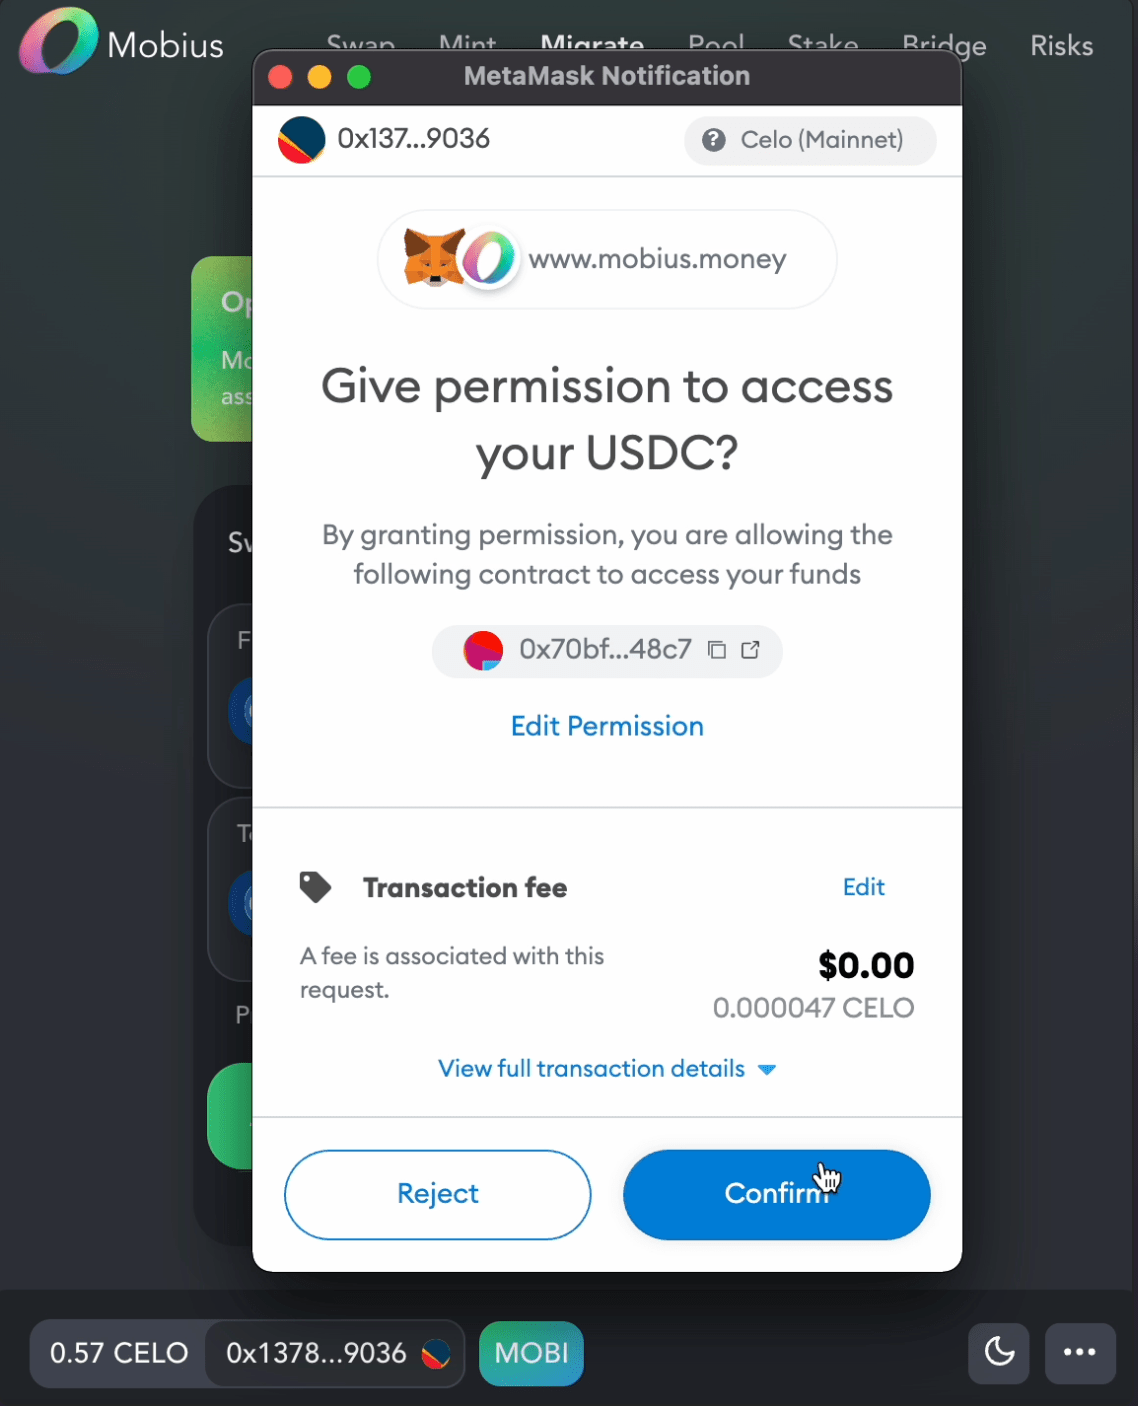
- Swap.
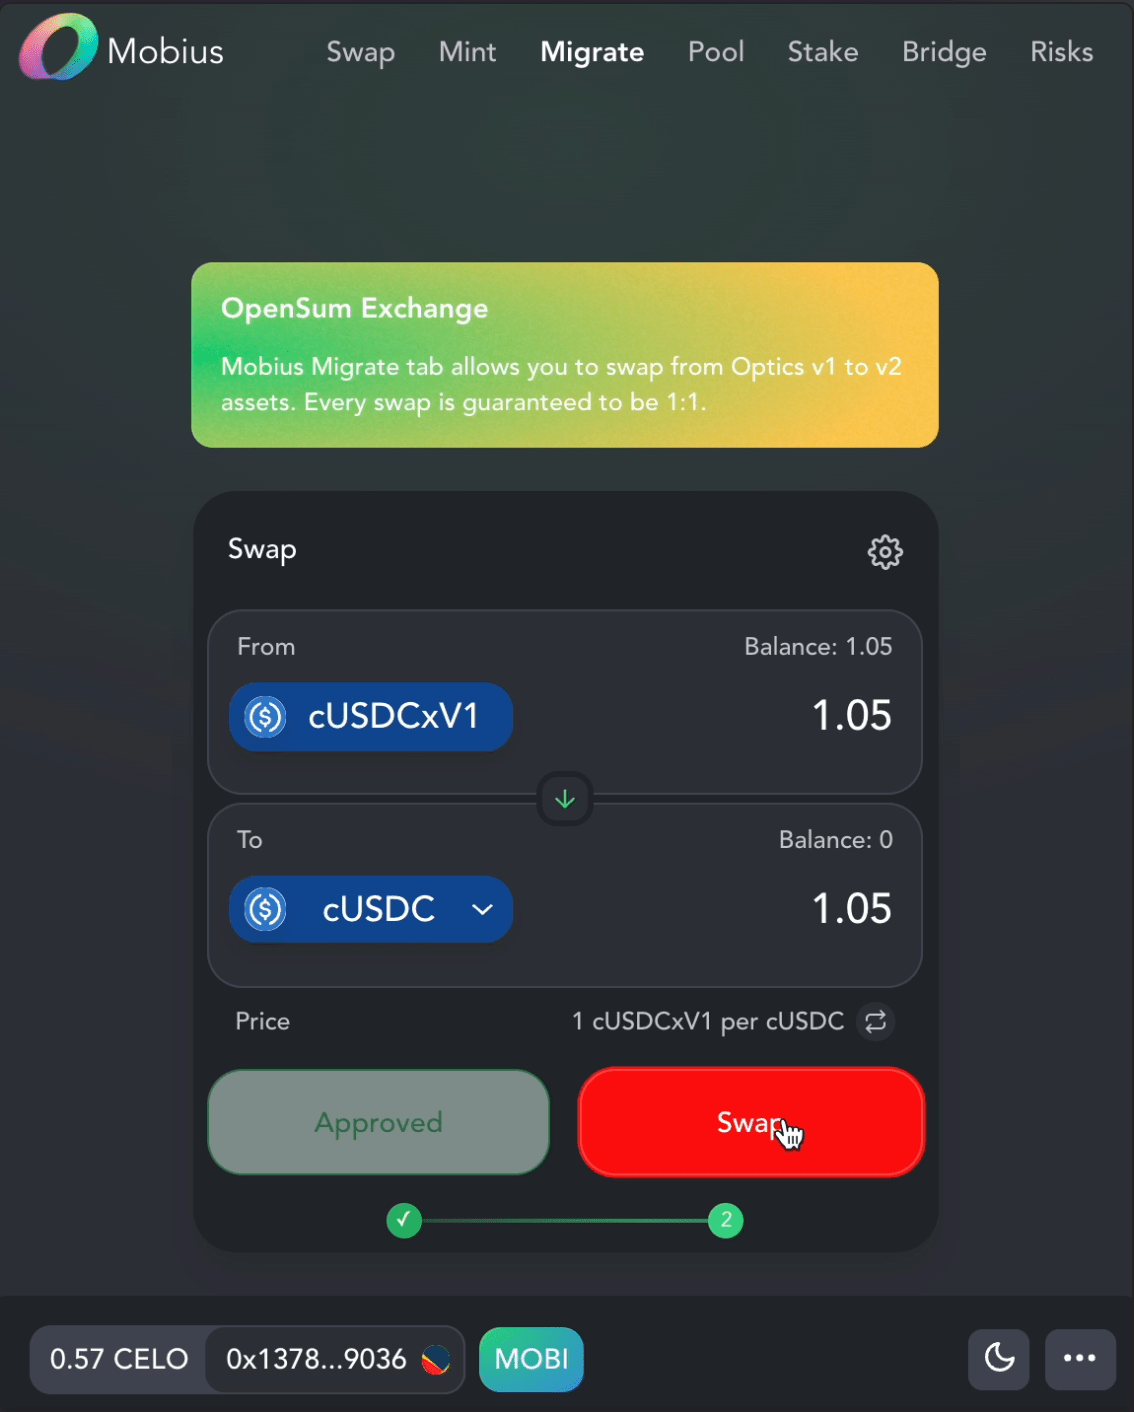
- Now visit the Swap tab to verify that you have swapped all your v1 token for v2 cUSDC, wETH, and wBTC.
Option 2
2a - Swap Affected Tokens for Unaffected Tokens
You can migrate to Optics v2 by first swapping affected tokens for unaffected tokens like cUSD, cEUR, CELO, cBTC, or cETH.
Swapping helps you save on gas fees from bridging out and bridging back to Celo.
There are several AMMs you may use to perform these swaps: Mobius, Ubeswap, and Sushiswap are the primary methods for performing these swaps on the Celo network.
Mobius
- cUSDC (Optics) → cUSD
- wETH (Optics) → cETH
- wBTC (Optics) → cBTC
cETH and cBTC tokens may be unwrapped by visiting wrapped.com. At this time, only institutions and accredited investors may apply for an account. For others, they will be offering OTC unwrapping in early December 2021.
Sushi
You can use Sushi to swap the following pairs:
- wETH (Optics) → cUSD
- wETH (Optics) → cEUR
- wETH (Optics) → CELO
- DAI (Optics) → cUSD
Ubeswap
You can use Ubeswap to swap the following pairs:
- TFBX (Optics) → UBE → cUSD
- CRV (Optics) → cUSD
- AAVE (Optics) → cUSD
- SUSHI (Optics) → cUSD
- USDC (Optics) → CELO
- WBTC (Optics) → cUSD
- WBTC (Optics) → CELO
- WETH (Optics) → cUSD
- WETH (Optics) → CELO
As liquidity on v1 pools is removed, the market depth will decrease and the price impact for making these swaps will increase dramatically. Pay close attention to slippage, price impact, and overall cost when making a swap.
2b - Swap Unaffected Tokens for Optics v2 Tokens
As Optics v2 Liquidity Pools come online on Mobius, Sushi, and Ubeswap you may swap your cUSD, cEUR, CELO, cBTC, cETH for wBTC, wETH and other v2 tokens.
To find a list of tokens supported by Optics v2, you may visit Optics v2, https://optics.app.
- Connect using Metamask
- Tap or click on your wallet address
- View the list of available v2 tokens and their smart contract addresses.

Option 3
3a - Bridge Affected Tokens Out and Back
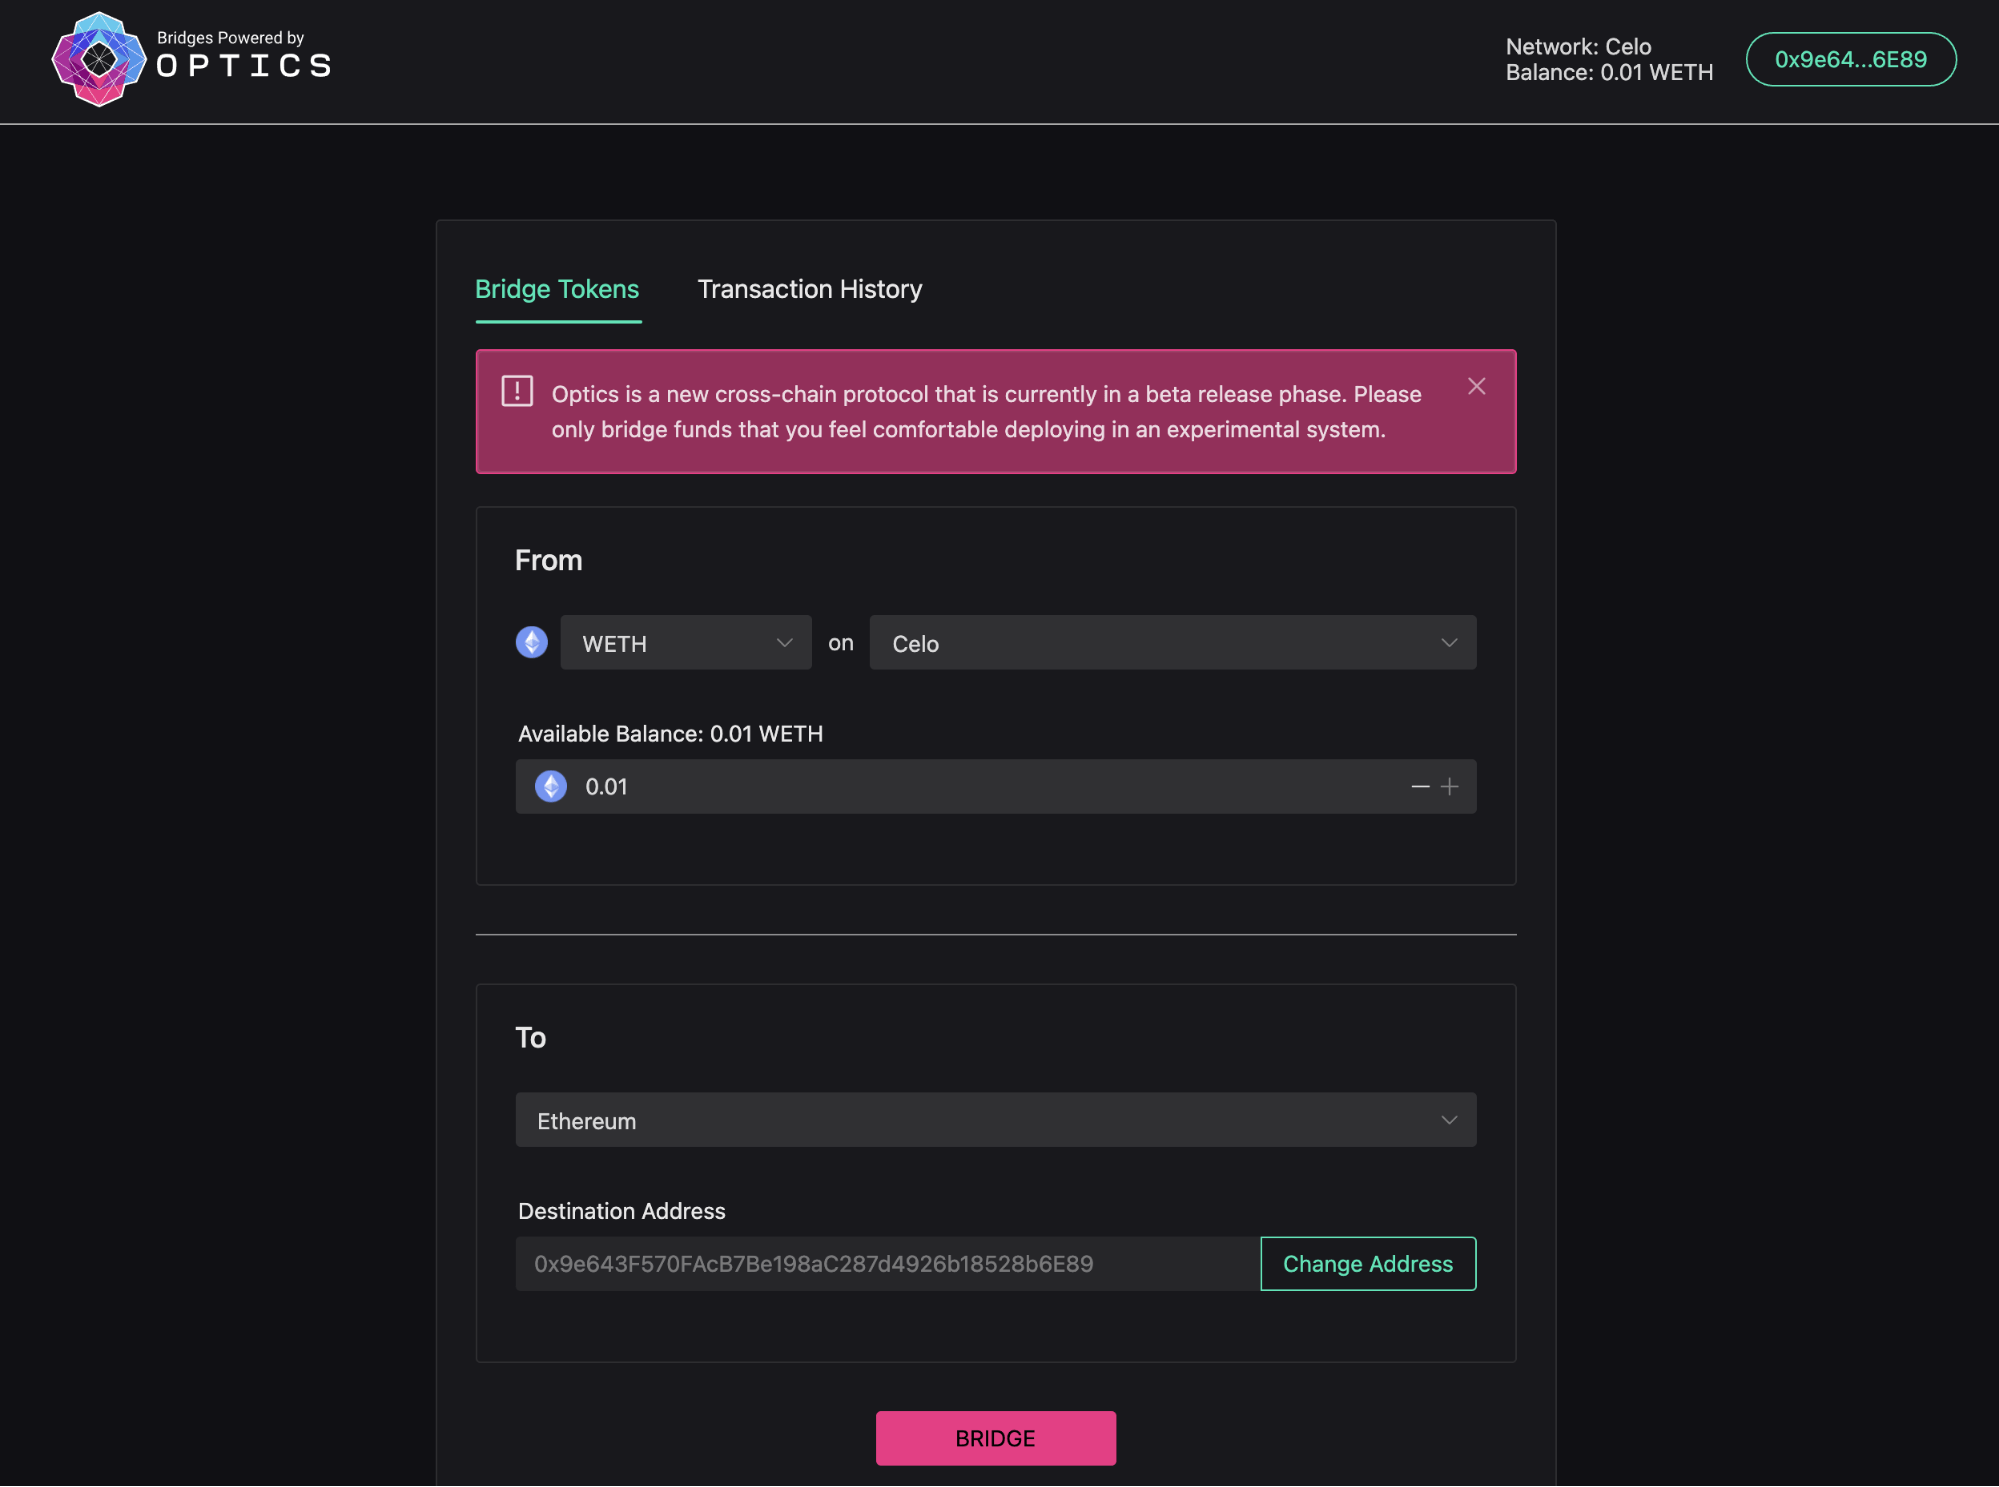
Bridge Tokens from Celo back to Ethereum or Polygon using Optics v1
When bridging from Celo to Ethereum network:
- Send only wETH, wBTC, DAI, USDC, TFBX, Sushi, CRV, AAVE, USDT or Ethereum based tokens.
When bridging from Celo to Polygon network:
- Send only USDC (PoS) and WMATIC or Polygon based tokens.
- Install Metamask from metamask.io
- Make sure you have the desired token in your Celo account
- Go to the Optics Bridge v1 app
- Connect Metamask
- Make sure Metamask is connected to the Celo network
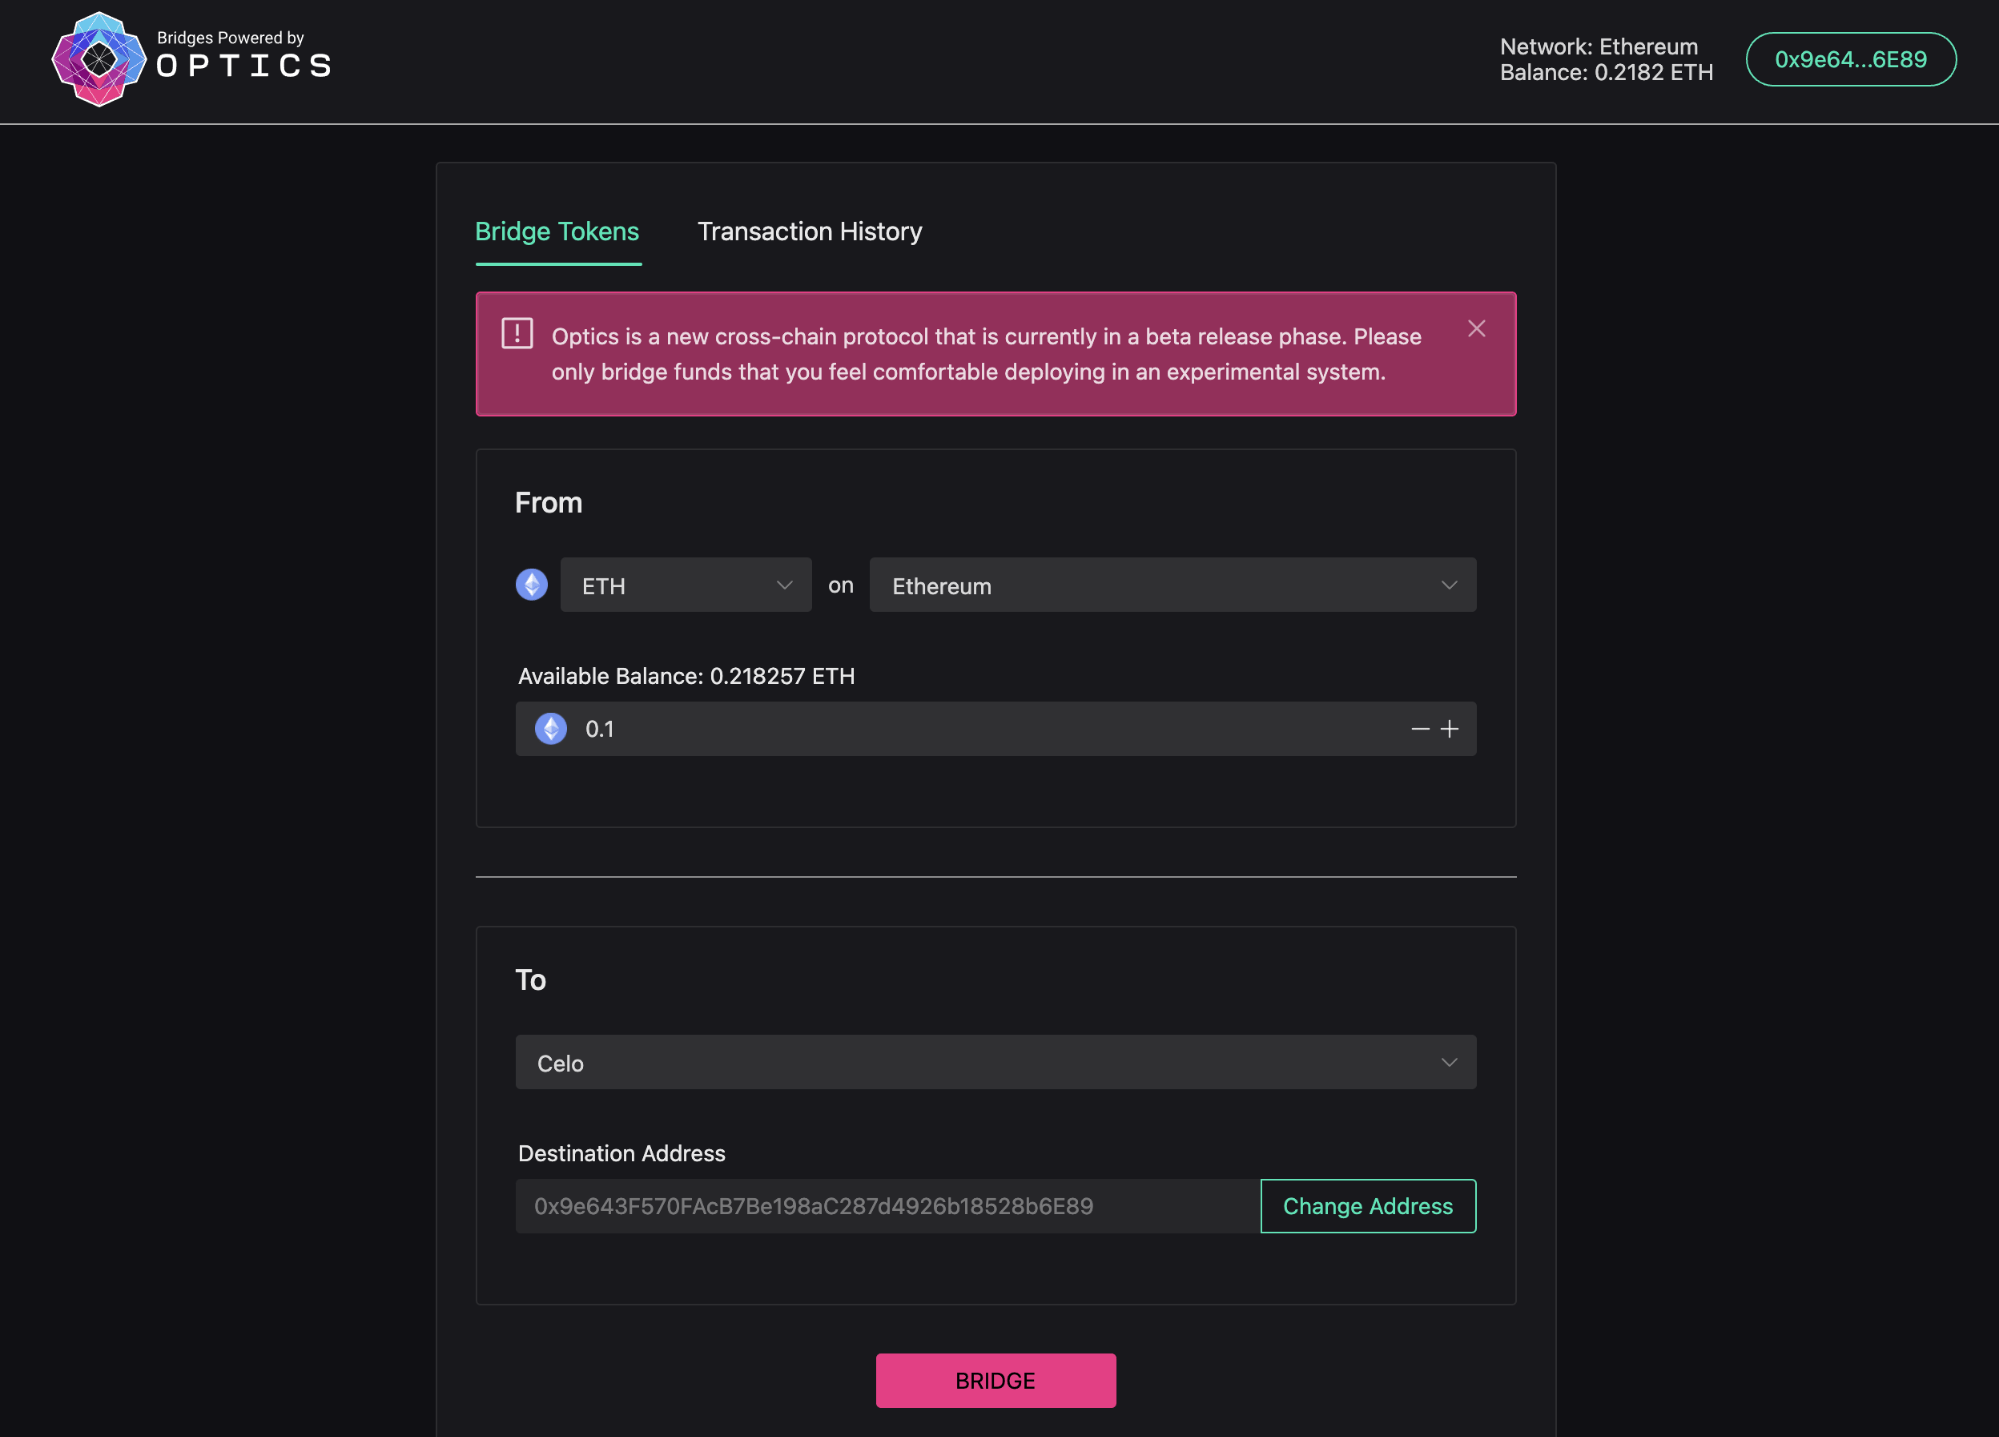
- In the From section, select the desired token on Celo. This indicates that you want to send the desired token currently on Celo.
- Enter the amount, destination chain (Ethereum in this case), and destination address. The sending address is filled in by default.
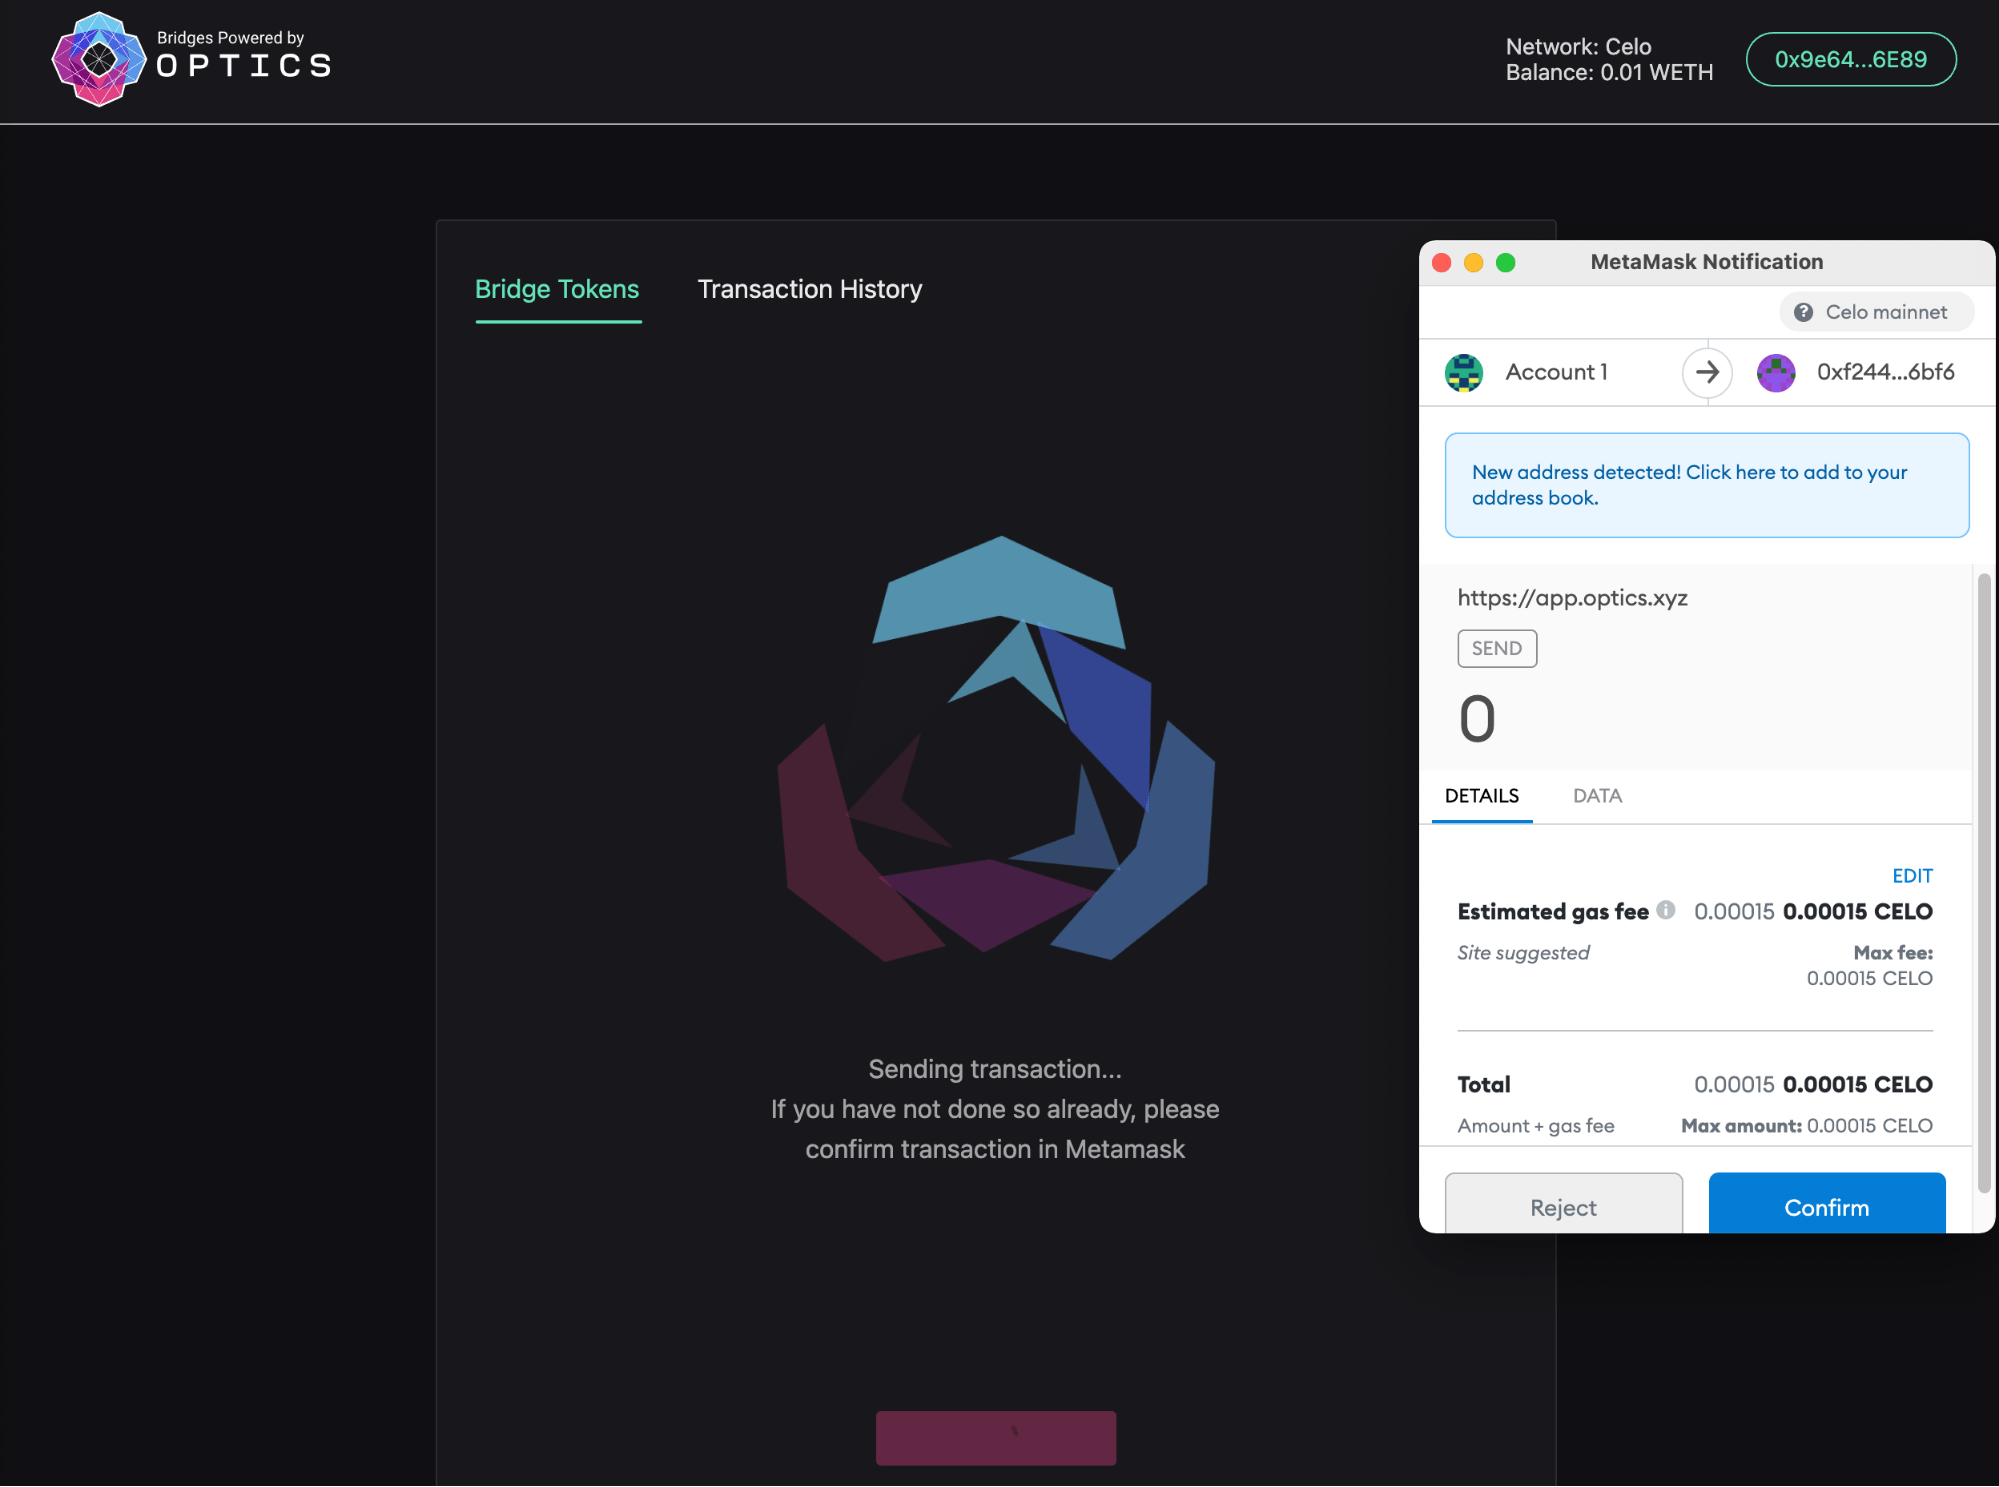
- Click Bridge and confirm the transaction from the MetaMask Notification. This approves the Optics Bridge to send WETH on your behalf.
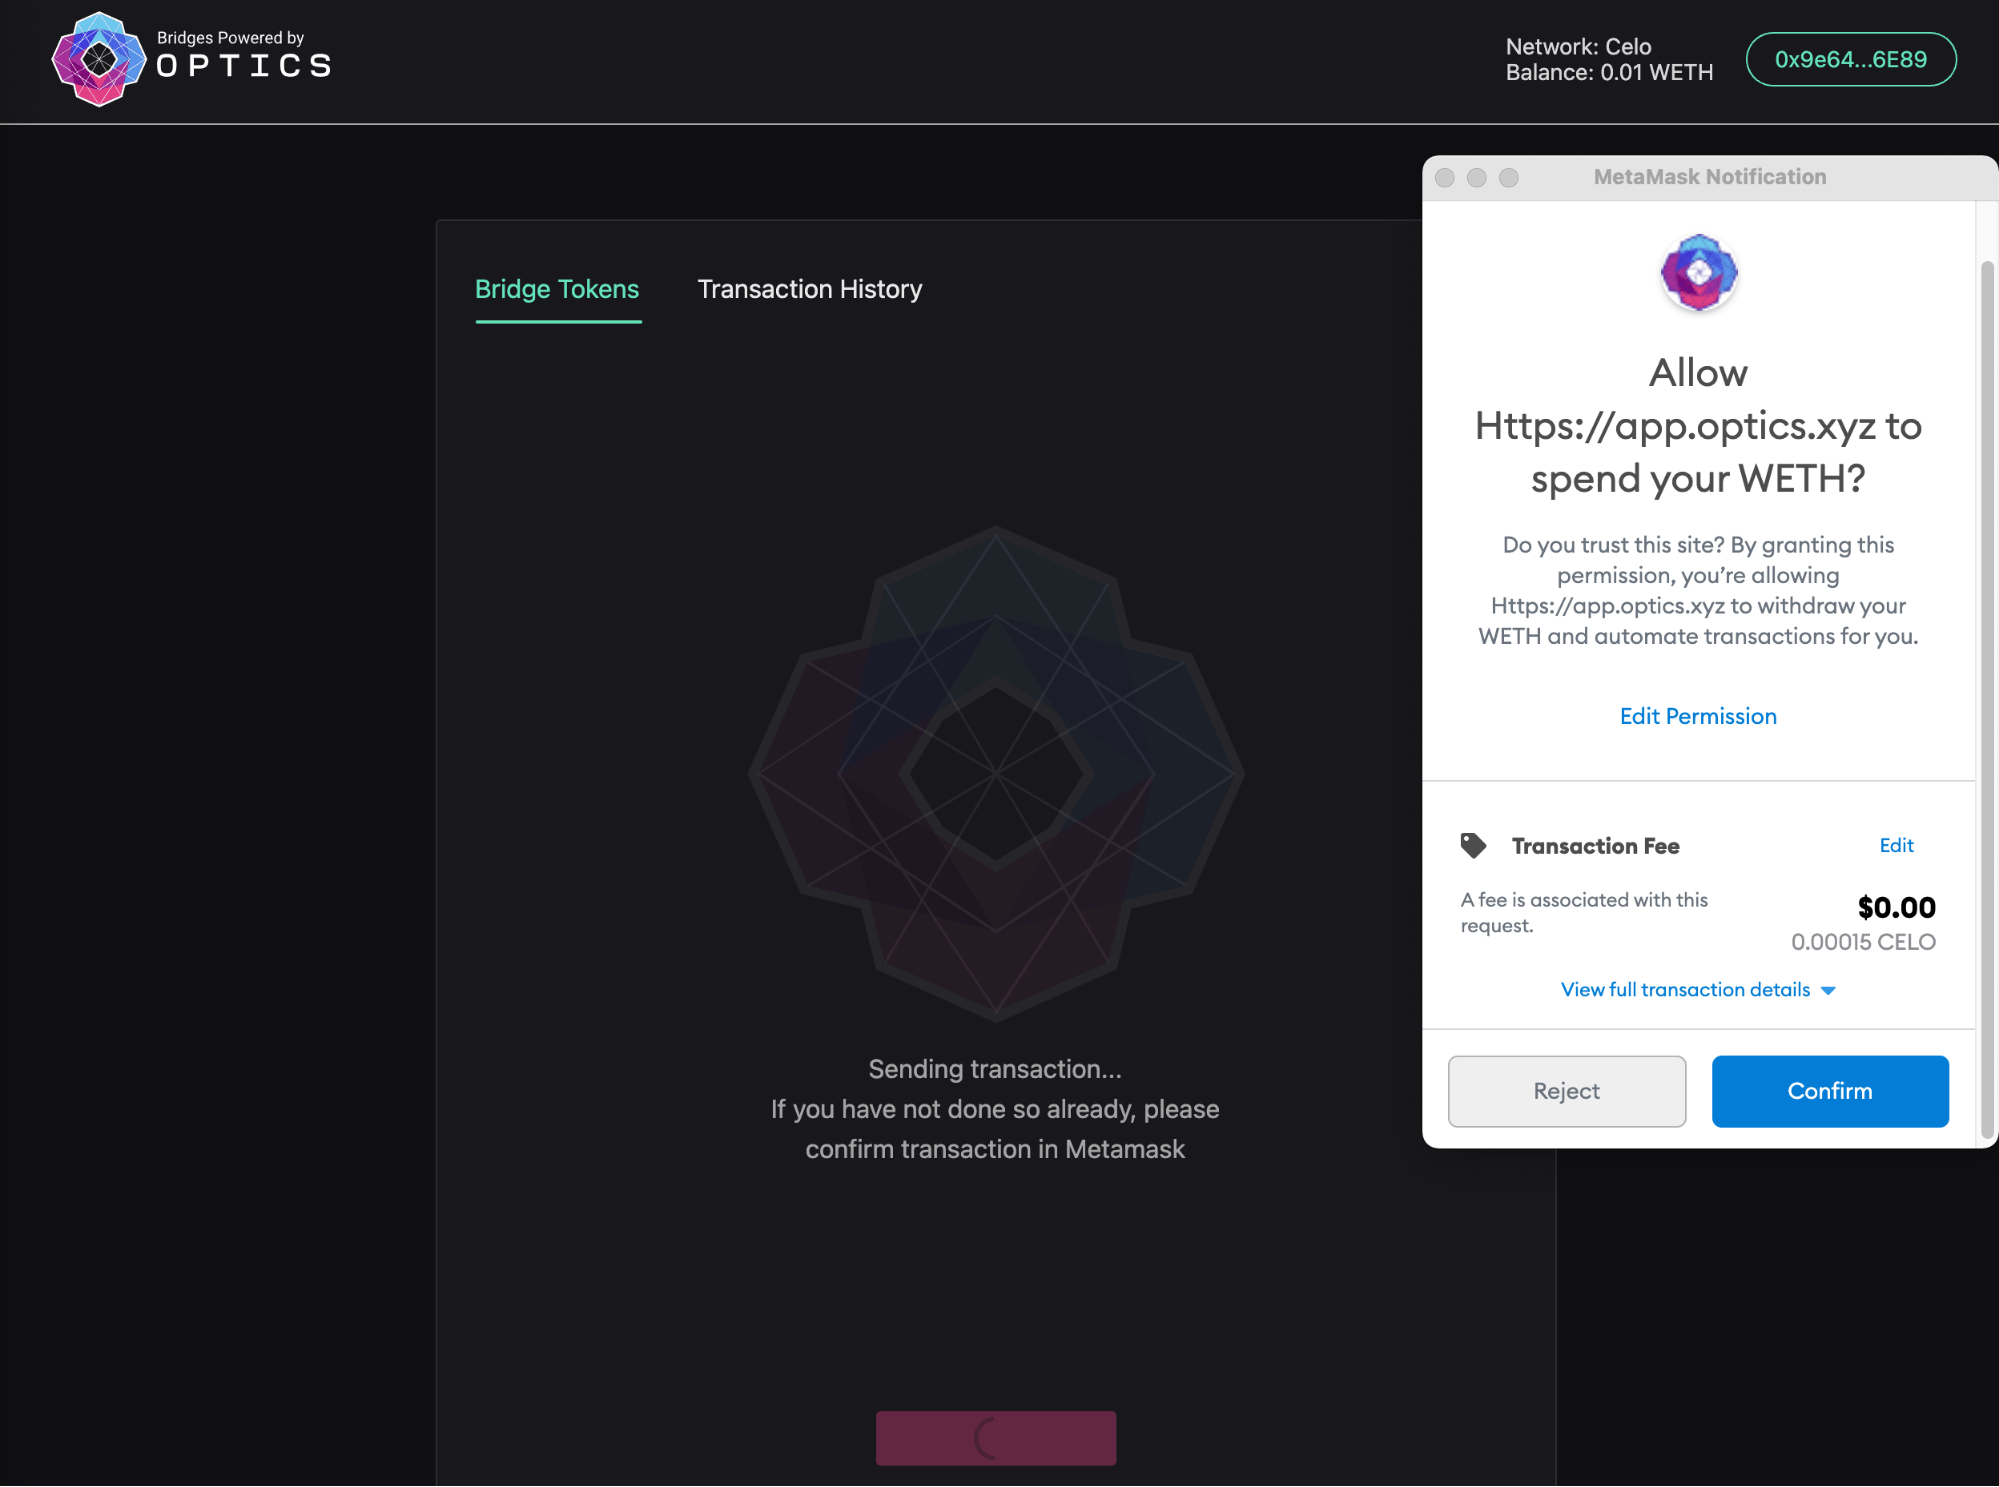
- Once the approval transaction is confirmed, Metamask will ask for you to confirm the desired token transfer to the bridge. Select Confirm.
- Wait for Optics to send your assets to the destination network
Once your transaction is approved your transaction details may not appear in the transaction history immediately. This does not mean that your transaction wasn’t successful. If you don’t see your transaction details, check a block explorer of the source network to verify that your transaction to the bridge was successful.
3b - Bridge back from Ethereum to Celo using Optics v2
Next, bridge your Ethereum network tokens back to Celo using Optics v2 will follow the same path as v1. v2 smart contract representations will be different from v1.
- Install Metamask from metamask.io
- Check that you have the desired token in your account
- Go to the Optics Bridge v2
- Connect Metamask
- Make sure Metamask is connected to Ethereum Mainnet.
- In the From section, select the desired token on Ethereum. This indicates that you want to send the desired token that is currently on Ethereum.
- Enter the amount, destination chain (Celo in this case), and destination address. The sending address is filled in by default.
- Click Bridge and confirm the transaction using the MetaMask Notification
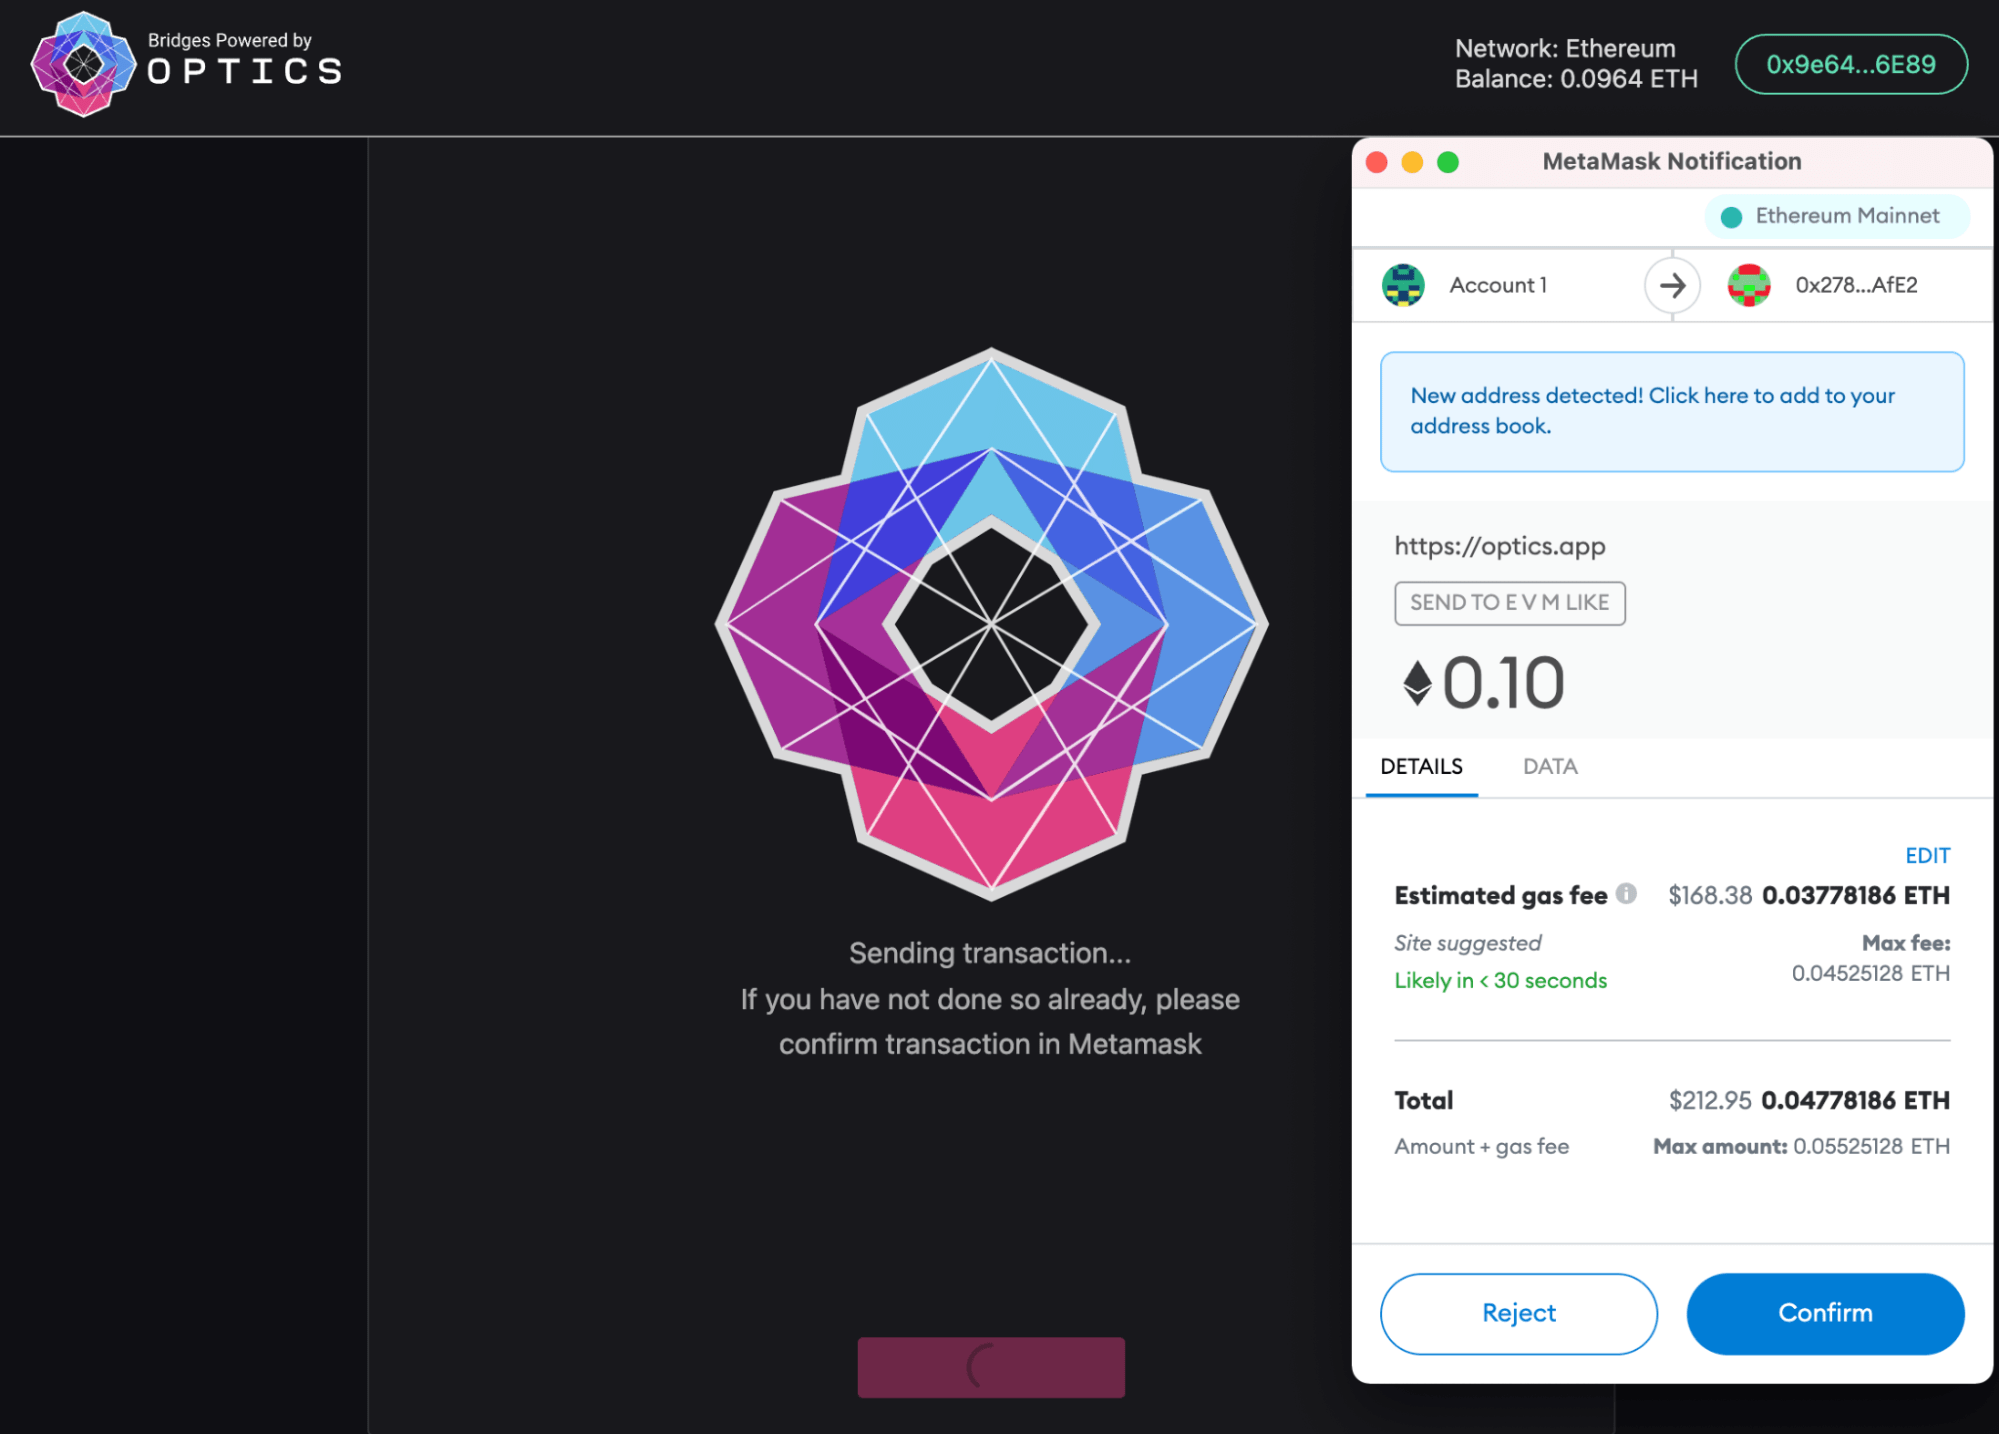
- Click Confirm
- Once your transaction is confirmed, you will be taken to the Transaction History tab where you can see your pending transactions through the bridge
- You can view the status of the transfer by mousing over the Status of the transaction
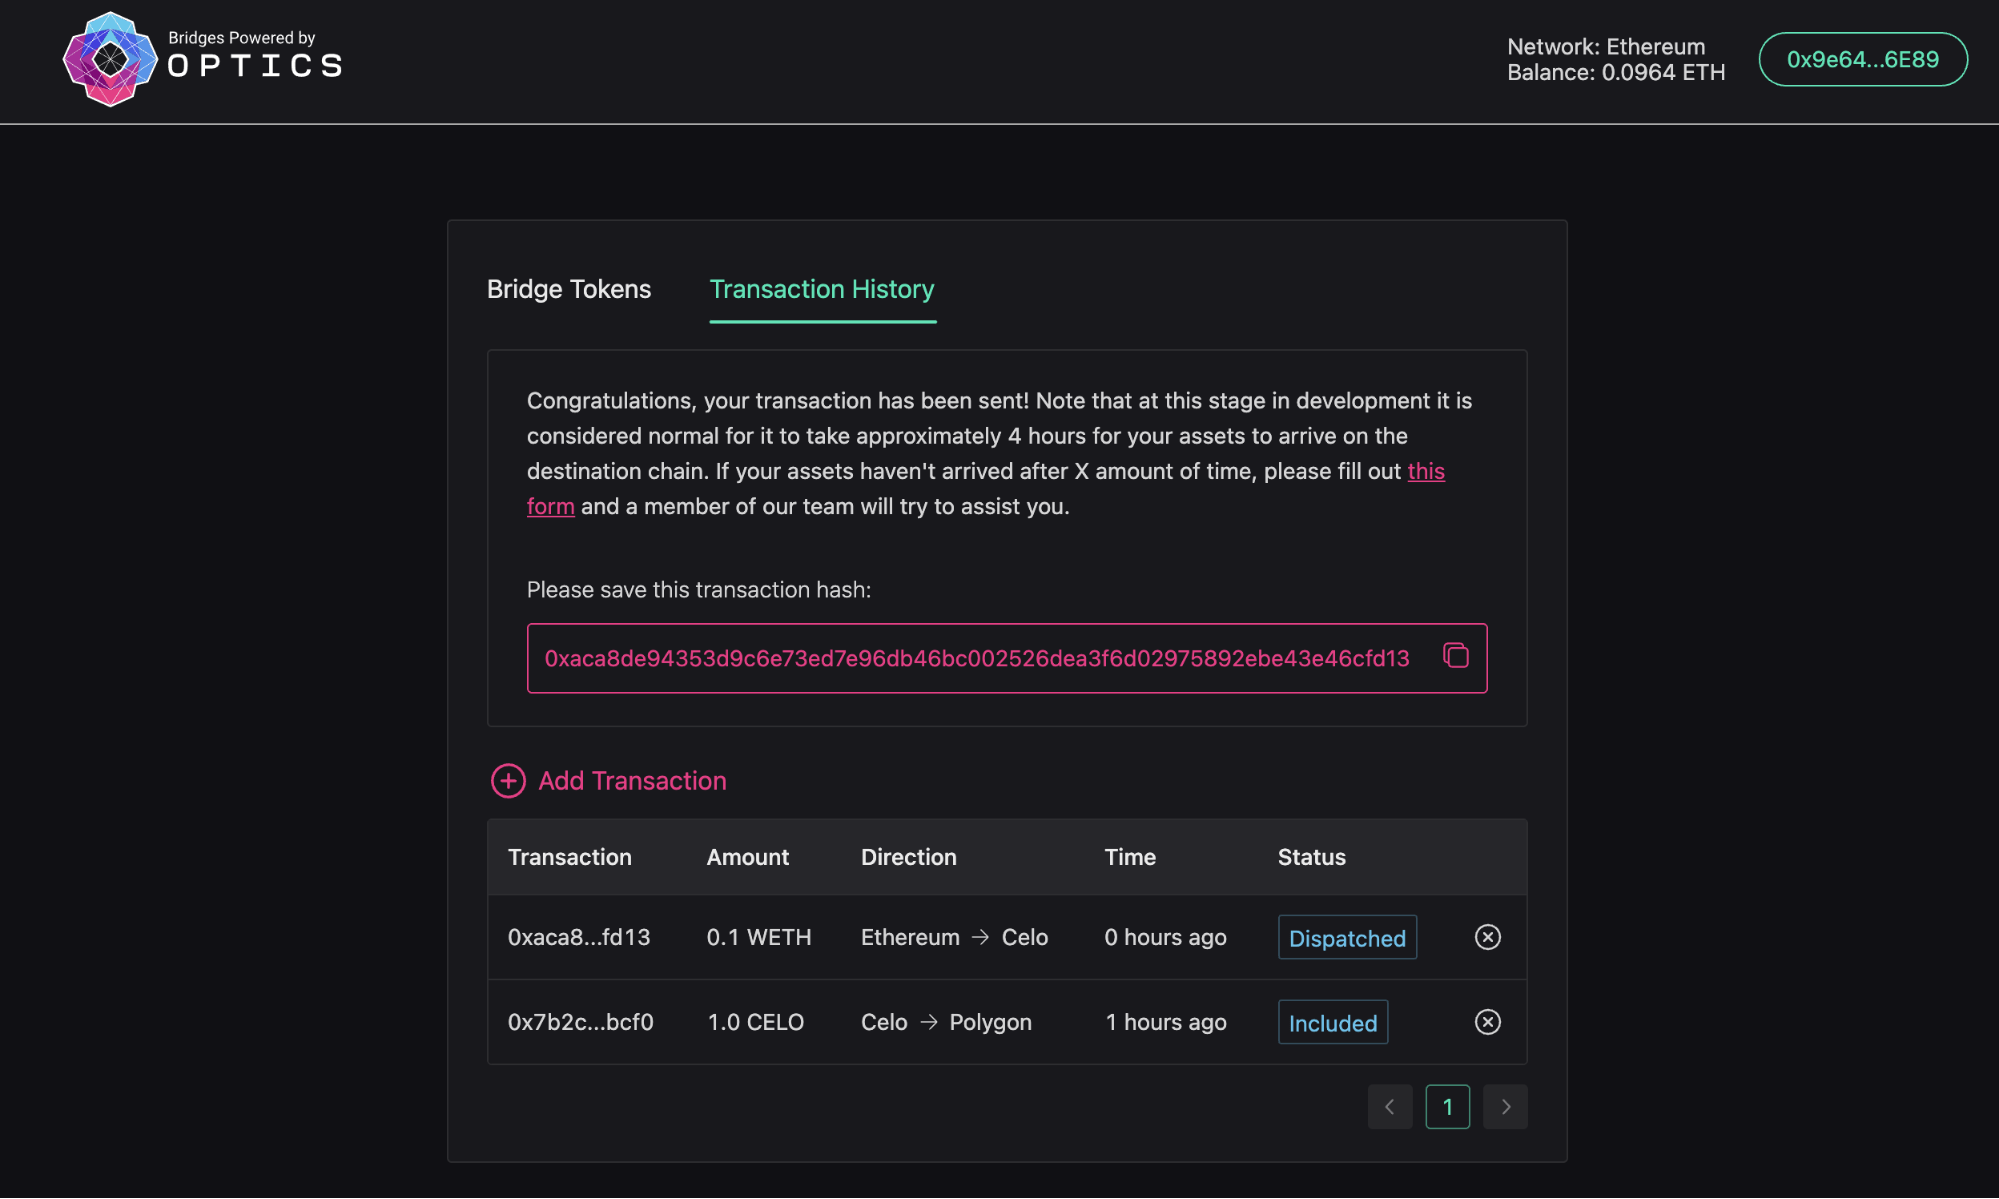
- Wait for the desired token to be bridged. Your desired token will show up at the specified account address when bridging is complete.
Once your transaction is approved your transaction details may not appear in the transaction history immediately. This does not mean that your transaction wasn’t successful. If you don’t see your transaction details, check a block explorer of the source network to verify that your transaction to the bridge was successful.